Saturday, February 28, 2009

Get Dollar Each You Send Photos To Testimonial


If you read the title of this article, you may be asked: whether this article correctly? whether not to deceive? The answer is: yes, this article is correct and there is no iota of intent to deceive. If you have a myspace profile, then you can utilize as a land of dollar. How to get the dollar is not difficult, but can be very easy. You need to do is: register to the shareapic.com site, and upload the picture there, copy the HTML code from the image that you upload, and send this photo through it in friendster testimonials. Each time an image is seen, then you will get a dollar. If you have collected as much as $20, then you can have it delivered to your paypal account.

I HAVE BEEN UPLOADED A CUTE PICTURE!!


To start immediately, please follow below steps.

  1. Register yourself at sharepic.com
  2. After registered, click on Add Gallery.
  3. Please wait for a moment, then upload your picture!!!
  4. After upload, copy the code of your picture, and send to friendster testimonials.


Now you only need to see results. Send images through the testimonials to your friends profile, so that the more frequently seen and the larger the payment for you. Ok, good luck!
READ MORE - Get Dollar Each You Send Photos To Testimonial

Change the URL Friendster Profile With Domain. CO.Cc


Do you have a Friendster profile? I believe, you definitely have a Friendster profile. With this profile, we can find a friend from various parts of the world without limits. We can send and receive messages, send and receive comments, we change the layout of the profile to be more interesting, and many other features provided on Friendster. Hmm, maybe you also know that we can also change the URL of our Friendster profile. For example, the URL of your Friendster profile is profiles.friendster.com/1772819, then you can change it into profiles.friendster.com/johnwhite (only an example). But the URL is definitely too long. Hmm, now there is a free domain website, which you can use on your Friendster profiles, namely www.co.cc. For example, if the URL of your Friendster profile is profiles.friendster/1772819.com, then we can change it into www.johnwhite.co.cc. Of course, it will make your profile interesting and more fun. Hmm, if you are interested, you can follow this tutorial to complete.


  1. Please sign up at www.co.cc.
  2. Once registered, type the domain name you want, for example www.johnwhite.co.cc. If available, click the Continue button.
  3. On the next page, click on Set Up.
  4. In the Domain Management page, select number 3, namely the URL Forwarding.
  5. Fill in the form provided in accordance with the data your self. In the Redirect to field, enter the URL of your Friendster profile. On the Title Page, fill in accordance with the title that is displayed when you open friendster profile.
  6. Other fields do not need to be filled. Then, click Set Up. If successful, click OK.


Now that the steps you need to do is do a test on your myspace profile URL of the new. Open the browser and type in the URL of your friendster profile. If successful opening your friendster profile, I say congratulations! If not, it means you are less fortunate. Please try again later. Ok, happy to try!
READ MORE - Change the URL Friendster Profile With Domain. CO.Cc

Make Signature at the End Of Your Post

You have email? The answer surely is. Not possible you can be a blogger if you do not have email. And you have ever install the signature in your email? I think the answer is also yes. With the signature in the email, you can promote what you want to promote without considered spamming. What you think and to install the Signature at the end of your post? If you are interested to install one in your blog, following the steps you need to do: make your signature image -> upload to hosting -> paste the HTML code images to Blogger. To create an image of a signature, you can use any image software that you want.


The next step, upload your signature image to free hosting. To more easily, please upload to tinypic.com. After Uploading the finished, you will be given the HTML code from the image that you uploaded earlier. Copy the code is.

Then follow these steps.

  1. Log in to Blogspot.
  2. Click on the Settings menu.
  3. Click on the Formatting tab.
  4. Scroll down the page, and paste the code that you copied earlier in the Post Template box.


Now the HTML code of your signature image will appear every time you write. Remember to put the code in the end of post. Ok, happy to try and hopefully succeed!
READ MORE - Make Signature at the End Of Your Post

Make a "Contact Us Form" widget From Kontactr.com

If you read the title above, you may be asked: whether the Contact Us Form? And what can I do? The answer is: Contact Us Form is a widget-shaped form that can be used to send the visitor who wants to say something to the blog owner. For example, on my blog, there is a Contact Us Form, you can use it to convey your thoughts to me. If you have any suggestions on this blog, then Contact Us Form can be used to send your suggestion to you, so I can read it.

I hope you understand with my explanation.

Contact Us Form is a shaped form. And if for example you have questions, you can fill out this Contact Us Form and type your message, and send it. Currently, many sites that provide services to the Contact Us Form which can be added into the blog. To be more concise, I will study how to create a Contact Us Form from kontactr.com


  1. Visit http://kontactr.com
  2. After http://kontactr.com home page opens, click on the Sign Up link.
  3. Fill yourself in the data form.
  4. After you fill all the data, click Submit.
  5. If all the data you submit is correct, then you will be taken on the page that says that you have successfully registering. The next step is you need to verify your email address. Next steps is perform email address verification. Open your inbox, open email from Kontactr and click on verification link.
  6. After you click the verification link, your account will be activated and you can log in to kontactr.com
  7. After you log in, you'll be taken to a page that contains the HTML code of the widget you Contact Us. Then copy the code in the Embed Widget box, then make a post and insert the HTML code that you copy. But remember to set the Post Date and Time to the time that has past, so that the post is not seen posted on the main. Next, you can create a Contact Us link on the home page with copy link from the post that contains the Contact Us widget, and install in your home page.


Ok, hopefully successfully.
READ MORE - Make a "Contact Us Form" widget From Kontactr.com

Friday, February 27, 2009

Optimation Blog Meta Tag Title

One way to make it easier for a blog indexed with search engines is how to install meta tag. Meta tags will be explained to the search engine more about your blog. That way, our blog will be easier for indexed by Search Engines.

And now I'll let tips optimize Meta Tags in the Title blog. At default settings, always place the code from the blog title before the code from the post title. Hmm, now I will explain how to put the code from the post title before the code of the blog title. In this way, blogs can be more easily indexed by search engines.

If you want to make it, please follow these steps.


  1. Log in with your blogger account.
  2. Click Layout -> Edit HTML.
  3. Find this code (precisely at the top).

    <title><data:blog.pageTitle/></title>

  4. Then replace the above code with the following code.

    <b:if cond='data:blog.pageType == "item"'>
    <title><data:blog.pageName/> | <data:blog.title/></title>
    <b:else/><title><data:blog.pageTitle/></title>
    </b:if>


  5. Then click Save Template. Finished.


If you've been following the above steps is correct, then your blog can be very easy to be indexed by search engines. But remember! Search engines take several days to save the settings of your title meta tag.
READ MORE - Optimation Blog Meta Tag Title

Thursday, February 26, 2009

Adding Width and High of Shoutbox


You know Shoutbox? Surely you know. Shoutbox, blog visitor can interact with a visitor in another blog. One site is a service provider Shoutbox www.shoutmix.com. Hmm, you can also increase the amount of width and height of your Shoutbox. Hmm, how to make it?? Is difficult?? No, its very easy. Ok, i will explain.


In the previous post, I ever discuss how to add a Shoutbox in the blog. Hmm, now I'll know how to broaden and enhance your Shoutbox box.


In the HTML code of a Shoutbox, find width and height.

Change the number of number according to your wishes. If you want to broaden and enhance, add value number. But if you want to narrow and shorten Shoutbox, reduce the number of number. Then save.
READ MORE - Adding Width and High of Shoutbox

Add Top Comentators Widget in Blog

There is someone who ask me via email. The contents such as this.

Dear Andre.

I want to ask you, how do I add a Top Comentators widget in the blog sidebar?

Regards.


That is the content of the email someone sent via email. Well, I will answer questions through this article, so that everyone can read it.

With the Top Comentators widget, people who visit the blog we will know who has
to comment. The widget is also good to attract readers that would also
provide commentary. Therefore, you need to install this widget in your
blog sidebar. If you do not want to install, also no problem.


  1. Log in with your blogger account.
  2. Go to Layout.
  3. You will taken to Layout page, click on Add Gadget.
  4. Pop-up window will opened. Click at HTML/Javascript. Then copy hte code below and paste to blank box.

    <script type="text/javascript">
    function pipeCallback(obj) {
    document.write("<ol>");
    var i;
    for (i = 0; i < obj.count ; i++)
    {
    var href = "'" + obj.value.items[i].link + "'";
    var item = "<li>" + "<a href=" + href + ">" + obj.value.items[i].title + "</a> </li>";
    document.write(item);
    }
    document.write("</ol>");
    }
    </script>
    <script
    src="http://pipes.yahoo.com/pipes/pipe.run?_render=json&_callback=pipeCallback&_id=c92ac21897d8b56e61cfa85930dd89a1&filter=nickname&url=http%3A%2F%2FBlogName.blogspot.com&num=10"
    type="text/javascript"></script>


  5. Then save. Finished


Now, your blog is equipped with a Top Comentators widget.
READ MORE - Add Top Comentators Widget in Blog

Install Archive DropDown on the Classic Template

Hello readers! I discuss how to create the archive in the form of a dropdown into a new blogger template. Now I will explain how to create the dropdown archive in the classic template. I am sure, many bloggers are using a classic template. Hmm, I think this article is very helpful for bloggers who use a classic template.

How to create Dropdown Archive on a classic template is easy, follow the steps below.


  1. Log in with your Blogspot account.
  2. Click at Template.
  3. Click on Edit HTML tab.
  4. Backup your template before editing.
  5. Find this code in your template.

    <BloggerArchives>

    <a href="<$BlogArchiveURL$"$gt;'><$BlogArchiveName$></a>

    </BloggerArchives>


  6. Delete the above code and replace with this code:

    <select name="archivemenu" style="width:100%" onchange="document.location.href=this.options[this.selectedIndex].value;>

    <option selected>- Archives -</option>

    <BloggerArchives>

    <option value="<$BlogArchiveURL$>"><$BlogArchiveName$></option>

    </BloggerArchives>

    </select>


  7. Then save.


Now, your dropdown archive already added.
READ MORE - Install Archive DropDown on the Classic Template

Install Archive DropDown on the Blog

Did you do the archive? Archive is a collection of links that categorize the post based on the time published. For example, the 5 posts published in the Month of January, and 4 posts published in the Month of February, then in the archive will be created like this:

January (5)
February (4), and so on.


However, the problems become, there are bloggers who do not happy with the default view of the Archive, because eating a lot of space in the room page blog. Hmm, and now we can make the archive that are more flexible, but still function as an archive. Namely how to change the look with the archives has become a Dropdown Archive. How to create an archive Dropdown shape very easily, because you do not need to be bothered to learn HTML code.


  1. Log in with your Blogger account.
  2. Click on Layout.
  3. Please wait a moment. Now, you will look a display of your template stucture. Then click Add Gadget.
  4. You will see a lot of gadgets that you can attach. Scroll down the page until you find the Blog Archive. Then click the Blog Archive that.


  5. You will be taken to the Configure Blog Archive. In the style section, select the dropdown menu. Then save


Hmm, now you have your blog's archives are minimalist, but works optimally. This is very helpful for the visitor you can find other articles that published in your blog. In the next post, I will explain how to install Dropdown Archive on a classic template. Ok, goodbye!!! Don't forget to read my next article!!!
READ MORE - Install Archive DropDown on the Blog

Placing Google Adsense Under The Posting

Many bloggers who want to put their Google Adsense ads right under the blog article. But that was the case, the Adsense is code that can not be installed directly in the HTML template in our blog. If we are forced to install, then the message will usually appear like this.

Your template could not be parsed as it is not well-formed. Please make sure all XML elements are closed properly. XML error message: The processing instruction target matching "[xX][mM][lL]" is not allowed

Even if we successfully save the adsense code in the template, the code that will not be able to display adsense ads. Therefore, there is one thing that we need to place Adsense code in the blog template so that our ads appear under the post: parse adsense code. What is mean of PARSE???.

The purpose of the parse is to change the adsense code to be included in the template and displayed in the post. Example of adsense code before parse such as this.

<script type="text/javascript"><!--
google_ad_client = "pub-xxxxxxxxxxx";
google_ad_slot = "0276016466";
google_ad_width = 121;
google_ad_height = 60;
//-->
</script>
<script
src="http://pagead2.googlesyndication.com/pagead/show_ads.js" type="text/javascript">
</script>


After adsense code parsed, the results like this.

&lt;script type=&quot;text/javascript&quot;&gt;&lt;!--
google_ad_client = &quot;pub-xxxxxxxxxxx&quot;;
google_ad_slot = &quot;0276016466&quot;;
google_ad_width = 121;
google_ad_height = 60;
//--&gt;
&lt;/script&gt;
&lt;script
src=&quot;http://pagead2.googlesyndication.com/pagead/show_ads.js&quot;
type=&quot;text/javascript&quot;&gt;
&lt;/script&gt;


Hmm, now the code that you can place it in your blog. But the question appears: Google TOS does not allow us to change the adsense code for any reason, whether it is allowed? The answer is, "Google Allow this method." How may I dare to say how this is allowed? Of course. There is someone who wants to make sure that it's allowed. He sent a letter to Google that the content is as follows.

Hello Adsense Team:

This question is regarding putting Google Adsense code in new Blogger(owned by Google) into new XML templates. In order for Blogger to parse the Adsense Code in XML template, the Javascript has to be escaped, meaning replacing all the '<' with '<', '>' with '>' etc. After you publish you blog, and view the HTML code produced by the blogger, it would be the exactly the same as given from the Adsense generator. Would this be tampering of code even if the final displayed Adsense code is the same?

Thank you,
Regards
.


Then Google reply above email that its contents are as follows.

Google then respond through the email contents as follows.


Hi,

You are permitted to make minor edits in Blogger Beta. However, please keep in mind that in general publishers are not allowed to alter the AdSense ad code for any reason. Once you've generated the ad code in your AdSense account pages, you may not alter any portion of the code or manually change the layout of the ads.

Thanks for your understanding.
Sincerely,

The Google AdSense Team


That is, we can parse the adsense code that we have. Lets parse adsense code you have. Once completed parse the adsense code, enter the code in the template to you by following the steps below.


  1. Go to Layout.
  2. Click on Edit HTML. Mark on Expand Template Widget.
  3. Search this code: <p><data:post.body/></p>. If you use a template then select a code structure like this. <p><data:post.body/></p>

    <b:if cond='data:blog.pageType == "item"'>
    <style>.fullpost{display:inline;}</style>
    <p><data:post.body/></p>
    <b:else/>
    <style>.fullpost{display:none;}</style>
    <p><data:post.body/>
    <a expr:href='data:post.url'><strong>Read more...</strong></a></p> 
    </b:if>


  4. Paste your adsense code under the <p><data:post.body/> code. Example like this.

    <b:if cond='data:blog.pageType == "item"'>
    <style>.fullpost{display:inline;}</style>
    <p><data:post.body/></p>
    <b:else/>
    <style>.fullpost{display:none;}</style>
    <p><data:post.body/>
    <a expr:href='data:post.url'><strong>Read more...</strong></a></p> 
    </b:if>


    <br/><br>/&lt;script type=&quot;text/javascript&quot;&gt;&lt;!--
    google_ad_client = &quot;pub-xxxxxxxxxxx&quot;;
    google_ad_slot = &quot;0276016466&quot;;
    google_ad_width = 121;
    google_ad_height = 60;
    //--&gt;
    &lt;/script&gt;
    &lt;script
    src=&quot;http://pagead2.googlesyndication.com/pagead/show_ads.js&quot;
    type=&quot;text/javascript&quot;&gt;
    &lt;/script&gt;

  5. Then save your template.


Please wait some time (10 minutes), you will see your adsense ads appear below the article of your blogs.
READ MORE - Placing Google Adsense Under The Posting

Blogging With Windows Live Writer

window-live-writer
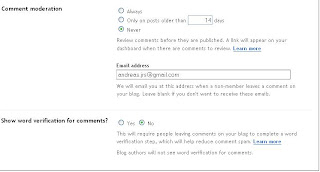
What do you do if you want to have a blog? Of course with the finish and create a blog for free there. And how do you post to your blog? Of course you must log in first at Blogspot with your ID. Hmm, do you know that you can also post on Blogspot without the need to log in first in the Blogspot? I certainly believe that many still do not know this until now.

If during this step that you do post the article to your blog is as follows: log in with your account Blogspot -> ago on the Dashboard page, click New Post. Hmm, at this time there is a more easy way to post in your blog, using the facilities of Windows Live Writer.


Currently, there are so many tools that can be used to do offline blogging, and one of the tools is the Windows Live Writer. With Windows Live Writer, you can create articles offline, and you click the Publish button. So the article will automatically be displayed in your blog.

I have not tried Windows Live Writers, but after hearing comments other bloggers who have to try it, then I can conclude one thing: the Windows Live Blogging is fun. Hmm, what the facilities provided in the Windows Live Writers? Following explanation.
Windows Live Writers allow you to post the article offline, so you do not need an internet connection first. Wow!

Currently, there are so many tools that can be used to do offline blogging, and one of the tools is the Windows Live Writer. With Windows Live Writer, you can create articles offline, and you click the Publish button. So the article will automatically be displayed in your blog.

I have tried Windows Live Writers, then I can conclude one thing: the Windows Live Blogging is fun. Hmm, what the facilities provided in the Windows Live Writers? Following explanation.


  1. We can Make Blogging Offline. Of course! With Windows Live Writer, you can do the post offline. We do not need to log in to Blogger or connect to the internet first. This can save our internet usage. Especially those using pay-per-quota system, Windows Live Writer will help us to save more we use the internet.
  2. Attractive Display. The first time I (Andre) using Windows Live Writer, Andre immediately fall in love with this tool because of the Post Editor display that attractive.
  3. Complete Editor Tool. You will find very many facilities if doing blogging on Blogspot. If you work in Microsoft Word, you will get a easier in the worked. So also with Windows Live Writer. If you want to add a table into your blog, but do not know much about HTML code, and Windows Live Writer is the answer of the above problem.
  4. Image Editor is useful. Windows Live Writer Tools Image Editor has a very good. We can create different effects on the image that we will include in our blog article as shadow effects, Photo Paper, Reflection, Water Mark, and many more.

    PC


    laptop

  5. .No Pictures Upload Requires. Of course, with Windows Live Writer,
    we do not need to upload the image because the image will be automatically Uploaded on Picasa Web Albums.
  6. Multi Preview Editor.
  7. Complete Font Settings. With WLW, you can make the case of the article you with just one click.
  8. With WLW, you can choose the type of editor that will display you use. You can select the HTML view or the view Normal / WYSIWYG ("what you see is what you get" version).
  9. This is are most important featured. WLW is FREE!!!


I think that enough. If you've tried WLW, you can find other interesting things that are not mentioned above. But essentially, blogging with Windows Live Writer is great fun. If you want to downloading WLW, click here.

Enjoy blogging with Windows Live Writer!
READ MORE - Blogging With Windows Live Writer

Wednesday, February 25, 2009

Placing Box Comments Below Post

If you visit other blog, maybe you look comment box placed under post. Its very useful because your visitor can give comments without need go to other page/load new page. After read, your visitor can give comments to your post with easier. If you interest to make it, you do not need to follow step with very difficult. You can follow step below with easy.

1. Log in with your blogger ID.
2. Go to Settings
3. Select Comments tabs.
4. In the Comment Form Placement options, select Embedded Below Post.
5. Then save.

Later if you open your blog and open your post, you will look your box commments appear under the post.
READ MORE - Placing Box Comments Below Post

Add a Online Visitor Tracker to Blog

At this time how many people are online in your blog? How to find out how many people are online in our blog, with how to install the Tracker Users Online blog. Users Online With Tracker, we can know how many people are online in your blog. Users Online Tracker is a small banner shaped. There will be number that indicate how much of your total visitor, and how many people who are online in your blog. One site that provides Users Online Tracker is www.histats.com. This site provided Users Online Tracker is very simple, but still functioning. Therefore, if you are interested, you can install into your blog.


  1. Go to wwww.histats.com.
  2. After site opened, click on Register.
  3. Fill in all forms such as the blog address, email address, etc. Then click Continue
  4. Click on Choose a counter from this category. Then select the style of the counter tracker will be added to the blog.
  5. Click Continue.
  6. Click on the dropdown menu, then select the category counter tracker which will be used. The available options are as follows: visitor today, Page views today, Users online, Total visitors and total page views. Choose empty if you want not to display them. Then click Continue.
  7. Please wait for a moment.
  8. Once the process is complete, the HTML code from the counter tracker will be displayed. Copy the code and paste it in your sidebar. If you do not know how to add widgets to the sidebar, then you need to read this article.
  9. Finished.


Now you already have a user online tracker. Each time you open your blog, you can find out the number of people who are equally open your blog / online on your blog. Ok, I think this enough. See you in the next post.
READ MORE - Add a Online Visitor Tracker to Blog

Tuesday, February 24, 2009

Make Drop Caps Effect on Post

If you read newspapers, surely you often see the effects of the DropCaps. DropCaps effe ct is installed on the first letter in the article. If you have worked with Microsoft Word, then you can make the DropCaps effects your document. DropCaps effect that look like this.

If you read newspapers, surely you often see the effects of the DropCaps. DropCaps effe ct is installed on the first letter in the article. If you have worked with Microsoft Word, then you can make the DropCaps effects your document. DropCaps effect that look like this.


To create an effect like this is easy. You need to add this code on your post.

<span style="float:left;color: #cc0000;background:#ffff66;line-height:80px;
padding-:2px 6px 0 0; font-family:verdana; font-size:100px;">First Alphabet Of Your Post</span>


For example.

<span style="float:left;color: #cc0000;background:#ffff66;line-height:80px;
padding-:2px 6px 0 0; font-family:verdana; font-size:100px;">I</span>f you're a Blogger, Technorati perhaps the term is no longer in a foreign ear you. Did you know about Technorati? If not, read this article to complete. Technorati will index all blogs around the world and placing them in the directory. Currently, they are indexing more than 112 million blogs worldwide. They also said that every day there are thousands of 120 blog born. Then a question appears: whether we will need to register to Technorati?


The results is like this.


If you're a Blogger, Technorati perhaps the term is no longer in a foreign ear you. Did you know about Technorati? If not, read this article to complete. Technorati will index all blogs around the world and placing them in the directory. Currently, they are indexing more than 112 million blogs worldwide. They also said that every day there are thousands of 120 blog born. Then a question appears: whether we will need to register to Technorati?

To be you more understanding, I will explain in detail about aboves code.

color: #cc0000 : this code works to set up alphabet color, #cc0000 code is garnet.


background:#ffff66 : this code works to set up background of alphabet, #ffff66 code is yellow.
#fff is code for white color, you can alter this code with you want color.


padding:2px 2px 0 0 : this the code dor padd, 2px--> padding for top, 6px padding for right,
0 --> padding for bottom, 0 --> padding for left. You can alter the value of padding with other value.

font-family:times : this code is for style of font, you can alter the font with font what you want.
Example Arial, Times New Roman and etc.


Font-size:100px : this code works to set up the font size, you can change the size of font.

Below are some examples of DropCaps.

<span style="float:left;color: #6131BD;background:#99C9FF;line-height:80px;
padding:1px 5px 0 0;
font-family:comic; margin: 0px 5px 5px 0px;
font-size:100px;">I</span>
f you're a Blogger, Technorati perhaps the term is no longer in a foreign ear you. Did you know about Technorati? If not, read this article to complete. Technorati will index all blogs around the world and placing them in the directory. Currently, they are indexing more than 112 million blogs worldwide. They also said that every day there are thousands of 120 blog born. Then a question appears: whether we will need to register to Technorati?

The result like this.

If you're a Blogger, Technorati perhaps the term is no longer in a foreign ear you. Did you know about Technorati? If not, read this article to complete. Technorati will index all blogs around the world and placing them in the directory. Currently, they are indexing more than 112 million blogs worldwide. They also said that every day there are thousands of 120 blog born. Then a question appears: whether we will need to register to Technorati?


<span style="float:left;color:#51bd31;background:#7f7f7f;line-height:80px;
padding:0 13px 0 10px; border: 2px solid #FF6FCF; border-right: 2px
solid #057B19; border-bottom: 2px solid #606160; border-top: 1px solid
#057B19; border-left: 1px solid #660000; font-family:Verdana; font-style:
italic;margin: 0px 5px 5px 0px; font-size:100px;">I</span>f you're a Blogger, Technorati perhaps the term is no longer in a foreign ear you. Did you know about Technorati? If not, read this article to complete. Technorati will index all blogs around the world and placing them in the directory. Currently, they are indexing more than 112 million blogs worldwide. They also said that every day there are thousands of 120 blog born. Then a question appears: whether we will need to register to Technorati?

If you're a Blogger, Technorati perhaps the term is no longer in a foreign ear you. Did you know about Technorati? If not, read this article to complete. Technorati will index all blogs around the world and placing them in the directory. Currently, they are indexing more than 112 million blogs worldwide. They also said that every day there are thousands of 120 blog born. Then a question appears: whether we will need to register to Technorati?

Perhaps the way over too difficult for you. You can create an DropCaps effect in other ways easier.


  1. After log in, go to Layouts.
  2. After that, click the Edit HTML.
  3. Please backup your template before edit. Click Download Full Template.
  4. Search ]]<</b:skin> code. Then copy below code and paste it before ]]<</b:skin> code.


    /* drop caps effect*/

    .dropcaps {
    float:left;
    color:#000;
    background:#fff;
    line-height:80px;
    padding-:1px 5px 0 0;
    font-family:times;
    font-size:100px;
    }

  5. Then save.
  6. Go to Settings tab.
  7. Click on Formatting.
  8. Scroll down the page and you will see Post Template. Beside Post Template you will look a empty box, type the following code there.

    <span class="dropcaps"> </span>

  9. Then save.


When you post an article, you can make dropcaps effect with the following code.


<span class="dropcaps">FIRST ALPHABET </span>


Now, you can enjoy the effect you DropCaps! See you at my next post!!!
READ MORE - Make Drop Caps Effect on Post

Monday, February 23, 2009

Tips Increasing Blog Traffic

Maybe if you read the title of this post, you will say: traffic your blog just a few, why give tips to increase blog traffic? The answer is: To have my blog traffic also increased. Now this many people searching for ways and tips to increase traffic, especially the bloggers. So, this post can be expected to index by
Search Engines, particularly Google.


In the blog world, a high Traffic is important. Why important? Because the traffic is high, blogs will look more professional. Not only that, if the blog has a high traffic, the blog can generate money for us, is with the PPC programs like Google Adsense.


Of course all bloggers want blogs that have high traffic. Therefore, I will describe a few ways that can increase traffic.


  1. Write Many Post/Article.

    By writing many articles, it means that your blog will have many articles that are ready for indexing by Search Engines. Moreover if the articles are discussing things that are very much sought through Search Engine, it can be ascertained there are so many visitors who come because the article is indexed by Search Engines. A blog can be said to have many articles, if have more than 150 posts.

  2. Install the Meta Tags into Blog Resources/Into HTML Template

    Meta Tags influenced to a blog indexed by search engines. Therefore, please add meta tags into your HTML template. Meta Tags function is to explain to the Search Engine on our blog. Meta Tags are the most important is to use 3, the Meta Description, Meta Keyword, and Meta Robots. Way to adding meta tags you can see here. If you open this blog, try to see the source code of your page by clicking View, and select View Page Source (For Mozzila). You will see a meta tag that is attached at the top. Meta tags are shown as follows.

    <META content='Andre' name='author'/>
    <META content='Andre Andreas Panggabean' name='copyright'/>
    <META content='7 days' name='revisit-after'/>
    <META content='FOLLOW,INDEX' name='robots'/>
    <META content='Global' name='distribution'/>
    <META content='general' name='rating'/>
    <META content='blog tutorial, blogspot tutorial, tips blog, template, blogger trick, blogspot trick, hosting, traffic, google' name='keywords'/>
    <META content='Practical Blogspot Tutorial and Other' name='description'/>
    <META content='True' name='MSSmartTagsPreventParsing'/>
    <META content='en-us' http-equiv='Content-Language'/>


  3. Submit Blog To Search Engine and Blog Directory


    With submitting your blog to Search Engine and Blog Directory, means that your blog is ready for inclusion into the database and Blog Search Engine Directory is. Submitting a blog can be done 1 time a month, or 1 times a week. But do not too often submitting blog because you can be considered spamming.

  4. Do Link Exchange with Other Blogger


    Make the link exchange is to help a blog to become more famous people. Therefore, do as many link exchanges with other bloggers. This can also increase our PageRank blog. If you often do link exchange, that will make your link very often be read by Google. And if a blog often to read a URL, then search engines will assume a blog is very important for indexing.

  5. Giving Comments On Other Blogs To Get Backlink

    Backlink is one-way link is very high quality. Unlike the link exchange, which has two directions. If our blog link in the another blog without install them in our blog, it will be called a backlink. In the eyes of Google, the backlink quality better than a link exchange. Therefore, please often give a comments on each blog you visit. Do not forget to install your link each time you commented, because it will be a very good quality backlink. But remember, do not give comments that there was only a link to your blog, because it will be considered spamming. The best way is to give a comment in accordance with the article, then put your blog link with insert the following code.


Perhaps now only this that I can explain, because I still have other activities. Later I will update this article again. I hope this can help for those of you who read it. If you have questions, please give comments.
READ MORE - Tips Increasing Blog Traffic

Sunday, February 22, 2009

Blog Directory : Technorati


If you're a Blogger, Technorati perhaps the term is no longer in a foreign ear you. Did you know about Technorati? If not, read this article to complete.

Technorati will index all blogs around the world and placing them in the directory. Currently, they are indexing more than 112 million blogs worldwide. They also said that every day there are thousands of 120 blog born. Then a question appears: whether we will need to register to Technorati?

Basically, we do not need to register to Technorati, because they will index our blog automatically. However, it is better if we sign up, because it will help the process of the index on our blog.

Then if the function of Technorati? With Technorati, a blog we will be more popular around the world. With Technorati, you can also monitor how popular the blog you have, know the blog's ranking and we can also know other blogs are linked to your blog.

If you want to immediately register your blog at Technorati, just click here.
READ MORE - Blog Directory : Technorati

Saturday, February 21, 2009

Add an Online Game To Blog

You love to play online games such as AyoDance, RF Online, Counterstrike, etc.? Have you ever been thinking to add a game into the your blog? If so, please see this article.

If you play online games like RF Online, Counterstrike, AyoDance, and the like, on Blogspot, you can add online games that are not less interesting to the online game that I mentioned above. Examples Deal Or No Deal, more people are love this game, and you can add it to your blog. Deal Or No Deal games like this.


This game is provided by www.khemer.com. If you are interested, you can follow the steps below.

  1. Go to www.khemer.com.
  2. Please see the games that interest you to add your picture to your blog, and click on the that game.
  3. Scroll down the page, and you will see Add this Game to Your Blog FREE! Copy the code provided and paste into your blog.
  4. Finished.


Now you can see an online game in your blog. You can play it anytime you want. Visitors can also enjoy your online games on your blog.

But if you are not happy with the games that are provided in www.khemer.com, you can do googling and find sites that provide online games to be added into the blog for free.
READ MORE - Add an Online Game To Blog

Create Blog Personal (Can not Read by Other People)


You have a diary? What you pour in your diary? Of course everything that you experienced. And in general, each person diary be sure the contents private. With the diary, we can mold what we experienced. You're sad? Or fall in love? you can write in your diary. And this diary can be useful to remember the memories we have experienced. Danger, if you write your secrets in the diary you (example: someone like you, and you write in your diary) and the diary you see other people, all the secrets about yourself can be uncovered.
And if for example you lost diary, of you will be sorry for. Hmm, Blogspot can be used as a substitute for your diary.

Visitor: Hmm, how can? What if other people read?

Andre :Certainly can, because we can Blogspot write what we want without limit.

And Blogspot also provide facilities Blog privacy, so other people do not have that can read it. How to make it is easy.


  1. Log in with your Blogger ID.
  2. Go to Settings tab.
  3. Click on Permissions.
  4. On the Blog Readers, select Only Blog Authors.. Will appear a pop-up window, click on Allow Authors Only.
  5. Finished


Now you can pour your heart flow into your blog as you all write to your hearts content in your diary. You need not fear any posts you read by other people, because you are only allowed to read the content of your blog. Enjoy your online diary !
READ MORE - Create Blog Personal (Can not Read by Other People)

Change Favicon on Blogspot

If you beginners in Blogspot, you will always look Blogspot favicon each open your blog. Maybe you bored with your logo and interested to replace this logo with other. You must edit your blog template to make it. Example in my blog, you can see emoticon favicon each you open my blog. And you can make it to your blog. You can replace with other logo that you have. But remember, you must have picture with smaller size. Below i will explain how to make it.


  1. Log in with your Blogspot ID.
  2. Go to Layout -> Edit HTML.
  3. Mark at Expand Template Widget.
  4. Search </head>. If found, copy code below and paste it before </head>.

    <link href='IMAGE URL' rel='SHORTCUT ICON'/>

    Change IMAGE URL with your URL image address.

  5. Then save.


Now, you can see your blog with your own logo
READ MORE - Change Favicon on Blogspot

Saturday, February 14, 2009

Make Post with Highlight

You like read the book? Or maybe you like read the magazine? You certainly never see any posts marked such as background and border. It was given the name "Highlight". And while you may be doing the post, there are some "important sentence" that need to be marked specially, so that sentence is easy to find by readers. Therefore, you can create a sentence that is given highlight such as I mentioned above.

To make the above, you need to do the following steps.

  1. Log in with your Blogger ID.
  2. Click on New Post.
  3. Enter this code.


  4. <div style="background:#0005F5; border:1px dashed #3D3DFF; padding:5px;">


    Write here...


    </div>


  5. Maka hasilnya akan seperti ini.


  6. Write here...


If you enjoyed this post, please gave your comments.
READ MORE - Make Post with Highlight

Trick Make Post with Number

you know Microsoft Word? I believe that you surely know. With Microsoft Word, you can type the number when you work with Ms. Word. For example:

  1. Example 1.
  2. Example 2.


And we can also make things like the time we post an article on our blog. Very easy to do. No need to edit the HTML template.

Ok, I explain. How, when you want to use the posting system number (numbering), you require to enter this code.

<ol>
<li> TYPE YOUR TEXT HERE
</ol>


So the result will be like this.


  1. TYPE YOUR TEXT HERE
  2. TYPE YOUR TEXT HERE


If you want to add the amount, you only live duplicate code <li> TYPE YOUR TEXT HERE Good luck!!
READ MORE - Trick Make Post with Number

Friday, February 13, 2009

New Updated From Blogspot: Place Adsense Ads Below Your Post


Previously, i read how to placed adsense under blog posting. And how the need to edit some code, so that it may violate Google's TOS. But, many Adsense publisher using this trick and can survive long in adsense. Now, Blogspot already updated their service for all bloggers. That are placed Google Ads under the post. Not only under the post, you also can make your ads placed in sidebar and post. How to make it is easy, follow simple tutorial below.


  1. Log in with your Blogspot ID.
  2. Go to Layout.
  3. Click Monetize tab.
  4. Select your ads placement. Then click Next.
  5. Done.

Now, under your post will appear your Adsense Ads.
READ MORE - New Updated From Blogspot: Place Adsense Ads Below Your Post

Trick Make a Content List

Content list is a useful tutorial on your blog, because with content list, your blog visitor know what the content of your blog. If you read book, of course, you will see a content list in a start page. And you can make it to your blog with easy and simple step. Below i will explain how to make a content list in our blog.


  1. Log in to your Blogger ID.
  2. Go to Layouts.
  3. Then click Edit HTML tab.
  4. Before edit your template, please backup.
  5. Mark the little box beside Expand Template Widget.
  6. Find code below


  7. <b:include data='post' name='post'/>

  8. Replace above code with code below.


  9. <b:if cond='data:blog.homepageUrl !=
    data:blog.url'>
    <b:if cond='data:blog.pageType != "item"'>
    <a expr:href='data:post.url'>
    <div style="padding:6px 0 6px 5px;border-right:1px solid #ccc;border-bottom:1px solid #ccc;margin-bottom:2px;background:#00FFFF;color:#FA5858;">
    <data:post.title/></div></a>
    <b:else/>
    <b:include data='post' name='post'/>
    </b:if>
    <b:else/>
    <b:include data='post' name='post'/>
    </b:if>


  10. Then click Save Template.
  11. Now, go to Page Elements tab.
  12. Click Add Page Element.
  13. Select Add HTML/Javascript.
  14. Copy code below and paste to blank box

    <a href="http://TutorialBlog.blogspot.com/search?max-results=200">Show all post &raquo;&raquo;</a>

    Change TutorialBlog your blog name. Example : my blog name is cheap-tutorial. Change 200 with other number, because this is the sum of how much post want to show.

  15. Click Save Changes.

READ MORE - Trick Make a Content List

Thursday, February 12, 2009

Submit Blog To Google Search Engine


Every blogger definitely want to get a high traffic in their blog. I sure, blogger that have high traffic, most certainly come from search engine. And
most of the visitor came from Google SE. Hmm, maybe you will ask: how to submit my blog to Google???. This is a reasonable question. Now, i will explain how to submit blog to Google.

1. Go to www.google.com/addurl.
2. You will taken to Google Submit Page.
3. In the URL, type your blog URL. Example http://blogging-trick.blogspot.com.
4. In the Comments, type about your blog or your blog description.
5. You will look an image, and under that image you will find a blank box.
Type a letter in accordance with the image.
6. Then click .

Now, your blog already submitted to Google. This will help your blog to get more traffic. BUT REMEMBER!!! Google not guaranted your site/blog will make high traffic after submitted. Your blog will indexed by Google after 1-4 week.

READ MORE - Submit Blog To Google Search Engine

Make a Box Comments Placed Under Post

Hello every body!!! I will explain how to make a box comments placed under post. Maybe you already look a box comments that placed under post at other blog. This is very useful because your visitor does not need to reload other page to gave their comments because box comments are placed under your post. If you interest, follow tutorial below.

1. Log in to your Blogger ID.
2. Go to Settings -> Comments.
3. On the Comments From Placements, select Embedded Post Below.
4. Then save.

Now, your box comments will placed under your post. I hope this tutorial useful to you .
READ MORE - Make a Box Comments Placed Under Post

Make a Comment Blog AutoSend to Your Email

Hello guys, in this time, i will explain how to Make a Comment Blog AutoSend to Your Email. This trick is very useful there if your visitor leave a comments, this will autu send to your email. So, you does not need to log in to your blog account if you want to know wether there are new comments. To make it, follow tutorial below.

1. Log in to your Blogger account. Then click Settings.


2. Click Comments.
3. Scroll to underside, and you will find a blank box We will email you at this address when a non-member leaves a comment on your blog. Leave blank if you don't want to receive these emails.. Type your email address in there.


4. Click Save Settings.

Now, you will always received email each your blog visitor give a comments. I hope this tutorial useful for you. OK, see you at my next post .
READ MORE - Make a Comment Blog AutoSend to Your Email

Contact This Blog Owner

Nothing is perfect in this world. So also with the blog. There is no blog in a perfect world. Every blog has certainly lack. So also with my blog. Therefore, if you have any questions, criticisms, or suggestions for my blog, you can send them via Contact Us form below. Do you just fill out the data yourself fully, and write down the message you want to send. Thank you for your criticisms and suggestions to my blog. Discussion and suggestions you are my inspiration to continue further.


Your Name :
Your Email :
Subject :
Message :
Image (case-sensitive):

READ MORE - Contact This Blog Owner

Wednesday, February 11, 2009

Add Google Talk Widget to Blog


You know Google Talk?? Ok, i will explain. With Google Talk, you can send instant message, make voice calls, leave voice message, etc. And now, are you know Google Talk also can installed in our blog?? Not know how to make it?? Ok, follow this steps.

1. Log in to your blogger ID.
2. After steps above, click on Layout.
3. You will directly to open Page Elements tab. Click on Add Widget.
4. Select Add Third-party functionaly or other code to your blog.
5. Copy code below and pasted into blank box that provided.

<iframe width="234" frameborder="0" src="http://talkgadget.google.com/talkgadget/client?fid=gtalk0&relay=http%3A%2F%2Fwww.google.com%2Fig%2Fifpc_relay" height="350">
</iframe><p style="margin:-8px 0"><br /><center>
<a style="text-decoration:none;font-size:70%;" href="http://blogging-trick.blogspot.com/2008/01/add-google-talk-to-blog.html">Add to your blog</a></center></p>


6. Then save.

Now, you will see Google Talk Widget in your blog. Have fun with this widget!!!
See you next time at my new post guys!!!
READ MORE - Add Google Talk Widget to Blog

Monday, February 9, 2009

Payments via Western Union is Available in Indonesia

Did you know Google Adsense? Of course, you know. With Google Adsense, you can make money from your blog. Usually Google Adsense paying via check. But, now is hotline news! Google Adsense Payment is available in Western Union! Wow!


With Western Union Metod Payment, our will faster receiving payment from Google. Hmm, how with Indonesia? Western Union is also available in Indonesia? Yes, now Western Union is available in Indonesia. And i hope, Google Adsense for Content will available in Indonesian Language.

READ MORE - Payments via Western Union is Available in Indonesia

Sunday, February 8, 2009

Tracking Blog Statistic with Google Analyticts

If you have blog, of course you want to tracking your blog statistic. And me is one from more blogger that want to know their blog statistic. Examples are tracking Hit Counter, Site Meter Track, and other. Hmm, if you included in the above, you can using service from Google Analyticts. Google Analiticts have several advantages compared to other trackers.

Google tracking points below:

1. Number of visitor every day.
2. Duration of their in our blog.
3. Browser that using for open your blog.
4. Where do they come (example: from other blog that have your link, or from search engine, etc).
5. Of states where they came.
6. Of town where tehy came.
7. Number of visitor age and other.

If you interest with Google Analiticts, you can sign up here. After sign up, Google will gave you a script that must be pasted in your blog. Remember, tracker data from Google updated every day, so, this service different with other tracker service that can change every second .
READ MORE - Tracking Blog Statistic with Google Analyticts

Saturday, February 7, 2009

Free Domain for Blogspot: .co.cc

In this time on tutorial blogspot, i will explain how to make free domain .co.cc. As you know, that .co.cc domain is a top level domain that you can get with free. Our can replace URL http://domainname.blogspot.com with http://www.domainname.co.cc. With .co.cc, our can controling DNS Records, A, MX, and CNAME records. So, domain .co.cc not only a URL FORWARDING. For Blogspot, you can select Zone Records Below i will sharing how to setting up co.cc domain with Zone Records.

1. On the Host column, type your domain name when you registered (example: www.domain.com).
2. On the TTL option, don't change any.
3. On the Type option, select that CNAME.
4. For Value, type ghs.google.co.

Next steps is changing the domain setting on Blogspot.

1. Log in to Blogger -> Settings -> Publishing.
2. Select Switch to Custom Domain.
3. After that click on Already Own a Domain? Switch to Advanced Settings.
4. After that, type your new domain in the box that provided.
5. Click Save Settings.

Finished!!! If successfully your new domain will be activated in maximazed 2 hour. So, please wait. Remember, your blog also can accessed by old domain.

if you have not yet registered and registering a domain, click the banner below.

CO.CC:Free Domain

READ MORE - Free Domain for Blogspot: .co.cc

Trick Make Calender On the Blog

You know calendar? Calendar is a important stuff in our life. Try to imagine if the case in your life, you not have a calendar?? Oh no, of course our time will not uniform. Not only in your home, but you can make beautiful calender on your blog with easy. Interest to make it??

If you interest to make calendar on your blog, you can utilizing the site that provides free calendar. For example, you can make a calendar from http://www.free-blog-content.com. They providing a calendar with more type. You can select a beautiful calendar from this site. Below is a example calendar from http://www.free-blog-content.com.


How to install it into blog is easy.

1. Log in to Blogger.
2. Go to Layouts -> Add Widget -> HTML/Javascript. Copy this code and paste into blank box.

<!-- FREE-BLOG-CONTENT.com -->
<br><center><iframe src="http://www.free-blog-content.com/Calendars/calendar00061.htm" width="162" height="228"
marginwidth="0" marginheight="0" frameborder="no" scrolling=no allowtransparency="true"></iframe></center>


3. Then save.

If you interest, you can make other calendar with more animation. Have fun!!!
READ MORE - Trick Make Calender On the Blog

Friday, February 6, 2009

Install Email Form Subscriber Widget

Know, i will share to you about how to make "Get Update Via Email" widget (Form Subscriber). This widget very useful because with this widget, your visitor can subscribing new articel in your blog directly via email. So, your visitor know if your blog updating. This widget can make your visitor don't forget with your blog. Ok, i will share here.

1. Visit http://www.feedburner.com.
2. At the blank box, type your blog feed address. Usually, blog Feed address like this: http://your-blog.blogspot.com/feeds/post/default. Replace your blog sentence with your URL name.
3. If your blog only contains video, mark on the I am Podcaster, if not, dont do it.
4. Know you need to type your important data. Then click Activate Feed button. You will receive message like this: "Congrats! your .....
5. Below will appear Next link and Skip directly to feed management. Select Skip directly to feed management.
6. Click Publicize menu.
7. After above, you will look some menu in the left. Click Email Subcriptions.
8. Click Active button.
9. You will look a box contains HTML code. Copy code from Subscriptions Form Code box, and paste it into your blog sidebar. Do not know how to install widgets in the sidebar?? View tutorialInstall Widget into Sidebar.

Know you can see your blog with Email Form Subscriber in your sidebar. Ok, good luck!!!
READ MORE - Install Email Form Subscriber Widget

Sunday, February 1, 2009

How to Check Size Blog

You definitely want to see your interesting blog. So also other bloggers. With a beautiful blog, then the visitor will be stay longer in your blog. However, in the case set off a blog, there is one thing that the bloggers are often neglected, namely the size of a blog (blog size).

If the size of your blog is very heavy, can be difficult to be loaded. Hmm, here i will give you widget that can check your blog size with easy step. Enter your blog address in the blank box below, then click Check. OK, i hope this helpful.


Your domain(s): Enter each address on a new line (Maximum 10)


(eg. iwebtool.com)


READ MORE - How to Check Size Blog

Kampanye Damai Pemilu Indonesia 2009

Now is February. Indonesia will provided "Kampanye Damai Pemilu Indonesia 2009". Kampanye Damai Indonesia Pemilu 2009 is a best Pemilu without fighting such as earlier.. Kampanye in this year must a better with previously.


And you know, in this year, CALEG Kampanye Damai Pemilu Indonesia 2009 is very much. Imagazine! 1 politic organitation have than more 5 politic participation! Wow! And i hope in this year, my father have than more votes from public. Sincerely. ^_^

note: This post is dedication, because me love "Kampanye Damain Indonesia Pemilu 2009" and because i following the SEO Contest with Kampanye Damain Indonesia Pemilu 2009.
READ MORE - Kampanye Damai Pemilu Indonesia 2009

How to Move Your Feedburner Account to Your Google Account

Hotline news!!! This news is less fun from Feedburner. Since google became the officially owner on Feedburner, Google moving Feedburner application to hardware, software, and Google data center. So, you must moving your Feedburner account to google account. If you dont moving your account until 28th February,
it will be very bad consequences. Your Feedburner account will be deleted and not availabled. How to move feedburner account is easier.

1. Log in tou your feedburner account.
2. After log in, will appear message like this: “ Hey! We are moving Feedburner accounts to Google. Learn more or Move your account now ". Click on "Move your account now”.
3. Select Google Account that will using. Then click Move Feeds.
4. Wait for the transfer of the process to complete. While waiting, you can minimize this window and browsing.
5. If finished, you will look this message: Success! We have successfully moved your feeds from Feedburner account into your Google account”. Congratulations!! Your account already moving !!

Hmm, its easy..

READ MORE - How to Move Your Feedburner Account to Your Google Account