Saturday, January 31, 2009

Alternative Free Hosting and Unlimited

If you have blog that contains free download service, such as download MP3, Video, Ebook, etc, you will need hosting service for placing your file, and i know you want to free file hosting. Hmm, free hosting service have problem like this.

- Limited Capacity Maximum
- Limited File Size Maximum
- Limited Traffic Maximum

And now already appear free hosting service that no have problem above. This service is Ziddu.

What you can get from Ziddu??

1. Unlimited capacity file uploaded. You can upload file without limit.
2. Limited file uploaded very large (200 MB).
3. Unlimited traffic.
4. You will get payment if your file downloaded ($0.1 per unique download).

Interest with Ziddu?? Lets sign up.
READ MORE - Alternative Free Hosting and Unlimited

Wednesday, January 28, 2009

Tips to be easily loaded blog

Maybe this case is asked by many of the bloggers, especially beginners blogger. 'Why is my blog is very difficult to load? While the blog other people is very easy when loaded? In fact the answer is easy. Speed access to a web or blog is important to take into account by the owner of the web or blog, because this is affecting the number of visits or traffik. Blog is very difficult to access or in the load will make the visitors feel very irritated and imprison intention to see your blog and do not hope they will come back at another time. What are the things that make blogs very difficult for loaded?


1. Flash File

Flash file is the file to a very heavy load. Therefore, do not install flash file excessive. What can install the flash pictures in Blogger? May be, but the picture must be uploaded on the hosting another first, then called with the HTML code so that images appear on the blog.

2. JavaScript

Not much different from the flash files, Javascript is also very heavy to load. Indeed Javascript to create different effects / functions that can make the blog more interesting, and you can create your own or take a free script in others site. But if too many Javascript installed, you can make your blog it difficult to load. Therefore, do not install too excessive Javascript.

3. Image

Install image with a large size will be difficult to access blog. You can use Image Compression for get image with small size. Or you can upload your image to other file hosting, and call it with HTML code to be appear in blog. Install image widget such as Followers from MyBloglog can make visitor very difficult to acces blog.

4. Blog Template

Selections template is also very influential, many of the template image as bacckground or the CSS is very large, very heavy so that when in use.

5. Showing Post With Very Much

Showing post with very much can make blog difficult to be load. This solution, set number of showing post.


And many more factors that can make the loading of your blog. what then the solution? of course you have to choose clever which is necessary for the tide in your blog. Don't following all the guides you apply on the Internet, select which is considered very necessary for the use.
READ MORE - Tips to be easily loaded blog

Tuesday, January 27, 2009

Gong Xi Fat Cai! Happy Chinese New Year!

Gong Xi Fat Cai, Gong Xi Fat Cai, Gong Xi Fat Cai! For all people in the world, i want to say:

Gong Xi Fat Cai! Happy Chinese New Year!


Happy Chinese New Year to All Chinese People in the world!! I hope in this time, our will get easier in life and blogging! And i hope article in this blog guiding all blogger and me will update this blog to TRY T0 BETTER. Okey!

READ MORE - Gong Xi Fat Cai! Happy Chinese New Year!

Sunday, January 25, 2009

Trick Insert MP3 Into Blog

Everyone surely have favorite songs. Can from the band in the country or abroad. And the good news, we can enter our favorite songs to the blog. How can? You want to know? Follow the tutorial below.

1. Visit http://codelagu.com
2. Type the name of your favorite song in the search box.
3. See results and click one of the results (click link Listen and Get Code.
4. Copy the code provided in the upper right corner of and paste in the the sidebar of your blog.

READ MORE - Trick Insert MP3 Into Blog

Saturday, January 24, 2009

Tricks Create Links That Redirected to New Page

When I open a blog belonging to other people, I found a link. When I click the link, I focus on the page / new tab. I wonder, how can? After viewing Page Source blog, so I know how.

How to make it is easy. If you usually make sure the link code like this.

<a href="http://blogging-trick.blogspot.com">Trick, Tips, And Tutorial Blogger</a>

You paste the code target = "_blank", so to be like this.

<a href="http://blogging-trick.blogspot.com" target="_blank">Trick, Tips, And Tutorial Blogger</a>


Hmm, the code above will change into a link. If you click the link, then you will be redirected to the new page.
READ MORE - Tricks Create Links That Redirected to New Page

Choosing The Right Browser To Blogging

In blogging, we need to choose the appropriate browser. Why is this? Because the browser to select the right, we can maximize our activities post with a browser that is appropriate to use for blogging. And I only one browser that is appropriate for use.


Namely Mozzila Firefox. Next reason I choose Mozzila.

1. Mozzila this could make the Internet connection speeds increase. So we did not wait long time to load a page.
2. Mozzila has fitu View Page Source Code and View Selection Source. With this feature, our can copy and paste a source from widget/text selection.
3. Mozzila has a search feature that sentence is very accurate in the page. This will help you when you edit the HTML template. Because the search features are accurate, you can easily find the HTML code that search.
4. This is the most important reason, because I can download Mozilla for free .

In conclusion: In order for the activities you can do easily blog, you better choose Mozilla Firefox.
READ MORE - Choosing The Right Browser To Blogging

Trick Install the Google Search Engine Blog

If the number of posts we very much, we need a search engine that can be installed on the blog so that the visitor can move to other articles easily. Want to install the google search engine on the blog? Follow the tutorial below

You just copy this code and paste into sidebar.

<form action="http://YOUR-BLOG.blogspot.com/search" method="get" width="10px"><table cellpadding="0" cellspacing="0"><tbody><tr valign="top"><td width="10%">
</td><td align="center" nowrap="nowrap"><input name="hl" value="id" type="hidden"><input autocomplete="off" maxlength="31" name="q" size="31" title="Search" value=""><input name="btnG" value="Search" type="submit"></td><td width="10%" nowrap="nowrap"><span style=""> <a href="http://www.blogger.com/advanced_search?hl=id"></a><a href="http://www.blogger.com/language_tools?hl=id">
</a></span></td></tr><tr><td colspan="1" align="center"><span style=""><span style="text-align: left;">
</span></span></td></tr></tbody></table></form>
<font size="1">Powered by <a href="http://blogging-trick.blogspot.com" target="_blank">Andre</a>


Change Your Blog any posts with the name of your blog address. Example: site-name.blogspot.com.

It's easy!! Good Luck!!
READ MORE - Trick Install the Google Search Engine Blog

Tricks to Create Profile Photo Frame

Blogger that like show profile and install the image there, I think this is a tutorial to try. Namely to provide a frame on the image profile, so that it can be seen more beautiful eyes. hmm, how to make it very easy, follow these steps.

To have a profile photo frames, step one is very simple, the only change the value sobat border on stylee css sheet on the photo for the profile, the code example for a profile photo template long like this:

.profile-img img {
float:left;
padding:4px;
border:1px solid #ddd;
margin:0 8px 3px 0;
}


For new template like this.

.profile-img {
float: left;
margin: 0 5px 5px 0;
padding: 4px;
border: 1px solid $bordercolor; }


You need to do is change the border into a larger, more clearly so, then I will describe in more detail.

float: left; -> means the photo will be saved in any posts on the left profile.

padding:4px; --> padding means is the distance between the image of the border 4px. If you do not want it, change into 0px.

border:1px solid #ddd; --> The purpose of this border is the size of the border. If you want to display more border width, you only need to change the number 1px with greater value. While the code #DDD is gray from the border. You can change color with the other.


Still confused how to change? please follow these steps!

For a classic template:

1. Sig in the blogger
2. Click the Template
3. Click the Edit HTML
4. Copy the entire code templates that have ago on the notepad and paste save. This data backup for when the error occurred editting
5. Find a code similar to the code below:


. profile-img img (
float: left;
padding: 4px;
border: 1px solid # DDD;
margin: 0 8px 3px 0;
)


6. Change the value of the border with greater value, 8px the example, so that the code will be like this:


. profile-img img (
float: left;
padding: 4px;
border: 8px solid # DDD;
margin: 0 8px 3px 0;
)


7. Click the Preview button to see the results change
8. If you are OK, click the Save Changes Template
9. Done.


While in the new template, the code will be similar like this.

.profile-img {
float: left;
margin: 0 5px 5px 0;
padding: 4px;
border: 1px solid $bordercolor;
}


Change the value of the border with greater value, 4px example, so that the code will be like this:


.profile-img img {
float:left;
padding:4px;
border:4px solid $bordercolor;
margin:0 8px 3px 0;
}


Preview the results, if the suit store the template.
READ MORE - Tricks to Create Profile Photo Frame

Friday, January 23, 2009

Place the IP Address Tracker On Blog

For the bloggers who blog like accessories, these accessories can be installed for the blog. This widget is tracking the IP address. Not only IP, but also can track what browser and operating system used what. This widget has Various appearance. One of the examples such as this.


How to make it is easy.


1. Go to http://www.ipnow.org.
2. Under the Custom Image there are some who can look at select. Take an example: click the Custom Graphical Image Info
3. Choose a background color and the color of the text you want.
4. Click Create My Image button.
5. Copy the code you have any posts under the Linked Image and paste in your blog's sidebar.

Good Luck!!!
READ MORE - Place the IP Address Tracker On Blog

Thursday, January 22, 2009

Trick Make Button in Posting

You can create a button in the post. You can also specify a URL that is opened if the button is clicked. Button is shaped like this.


How to make it is easy .

You only need to enter this code.

<a href="ENTER URL HERE/"><input value="ENTER YOUR MESSAGE HERE" type="submit"></a>

Replace ENTER URL HERE with your URL and replace ENTER YOUR MESSAGE HERE with your message.

It's easy. I believe you can do so. Good Luck!!
READ MORE - Trick Make Button in Posting

Tricks Eliminate Number In Label

Actually this is not a problem. But some bloggers who ask me via e-mail, on how to eliminate the number of labels. That is like this.

Blog Widget (2)

How easy. Follow the steps below.

1. Sign In to Blogger.
2. Go to Layout -> Edit HTML. Check the box Expand Widget Templates.
3. Find this code in your template.


(<data:label.count/>)


4. Delete the code. Then save your template.

Good Luck!!!
READ MORE - Tricks Eliminate Number In Label

Tricks Change Background Blog

When selecting a template, the template has a background color of the background. This background and various colors, depending on the template. Hmm, there was a way to change the background color is. Not only the color, we can also change the background color into the background is an image. But I suggest that the background color of the form better, because if the background is an image will make us difficult to read any posts. Ok, we direct to the main topics. Because each blog template code varies, which I will make the experiment is a template minima.


Minima New Template :

1. Log in to Blogger.
2. Click the Template.
3. Select Edit HTML.

body {
background:#fff;
margin:0;
padding:40px 20px;
font:x-small Georgia,Serif;
text-align:center;
color:#333;
font-size/* */:/**/small;
font-size: /**/small;
}


Change the color of the original code with the code color you want. (Code color is blue any posts above.)

Suppose you want to change the background to be green, the code to be like this.

body {
background:#80FF00;
margin:0;
padding:40px 20px;
font:x-small Georgia,Serif;
text-align:center;
color:#333;
font-size/* */:/**/small;
font-size: /**/small;
}


To view the edits, click Preview. If the suit is, save your template.
READ MORE - Tricks Change Background Blog

Trick to Make Link Download

I am sure that many bloggers create a blog theme free download. And things that are important for species such as bloggers over the need to have the file hosting.
Because hosting the file you will get the URL for the files you download. One thing you need to know is: you must know how to create a download link. How do? Easy, very easy.

You only need to type in this code.

<a href="URL DOWNLOAD">DOWNLOAD</a>

Hmm,it's easy .
READ MORE - Trick to Make Link Download

Tricks to Insert Youtube Video In Blog

Surely all the people already know Youtube.com? Youtube is the online video site that contains a lot of video with a variety of categories. You can find the video what you need in Youtube Youtube because of the various users across the world upload video to the site. In fact, you can insert a video on Youtube you like to blog. How can? Of can because I know how to insert video from youtube to blog. Know How?

Follow the tutorial below.

1. Go to Youtube.com.
2. Find the video you want to enter in your blog.
3. Open the video. Then see the right there is the option Embedded Video Embed.
4. Copy the code and paste in your blog. You can install in the post and in the sidebar.
5. Then save.

Later, if you open the blogging, the video will appear in the post / in the sidebar.
READ MORE - Tricks to Insert Youtube Video In Blog

Wednesday, January 14, 2009

Backup Your Blog Widgets

Hello guys! I hope you enjoy this time with my tutorial. Now, i will explain how to backup your widget. Why do we require to backup your widget? Of course. If you will change your template, you require to backup your widget, so that the widget can be installed again in your new template. If you change your template without backup your widget, you will lose all the blog widgets, such as: Shoutbox, banners, menus, etc. Because it is you need to backup your template widget.

Many ways that you can do to backup your widget. First I will explain how to backup from the "Page Elements" menu.


  1. Log in with your Blogspot ID
  2. Go to Layout.
  3. You will see a display like this (just example).


  4. Click on Edit. Pop-up window will opened.
  5. . Wait a moment, then copy all code of your widget and paste to notepad for backup.
  6. do this for all of your blog widgets.


READ MORE - Backup Your Blog Widgets

Sunday, January 11, 2009

Tricks Set Alignment Post Article

If you work in Microsoft Word, surely you already know the menu text flattening of the program. On this program there are four types of flattening the text, the Center, Right, Left, and Justify. Hmm, if we are working on Blogger, we also can make the flattening of text so that it can more cleanly.

How to make the blog is as follows.

1. Log in to Blogger with your Blogger ID.
2. If you want to install in the new post, just click the New Post. Then enter the following code at the beginning of this article.


Align Left

<div align="left">


Align Right

<div align="right">


Align Center

<div align="center">


Align Left and Right

<div align="justify">


Later enter a code in the above post for flattening you want. Do not forget the post ended with the code </div>.

READ MORE - Tricks Set Alignment Post Article

Tricks Eliminate Picture Tang and screwdriver

If we open the blog we're logged in with our blogger ID, then we can see signs of equipment in every widget in our sidebar. Equipment that's the picture to edit widget directly without having to go to the Layout menu. But there is less like a blogger with the picture and try it removed. Hmm, what is the image that the equipment can be removed? Can only.


How removed it is very easy. We only need to add a little script into the blog template CSS us. Learn? Follow the following tricks.

1. Log in to Blogger with your ID.
2. Go to Layout -> Edit HTML.
3. Search this code.

]]></b:skin>

4. Paste this code above.

.quickedit{
display:none;
}


5. Then Save.

Later, if you open a blog when you're logged in with your blogger ID, the sign of pliers and a screwdriver is already lost.
READ MORE - Tricks Eliminate Picture Tang and screwdriver

How To Changing URL

Sometimes there are bloggers that are less satisfied with their blog address. Perhaps because the address length, or does not fit the topic blogs, or other reasons. Change the URL does not difficult. Only condition, the URL you select may not already have a use. If you select a URL that is used another blogger, then you must be willing choose another URL. Hmm, if you want to know the tricks the URL, follow these steps.

1. Log in to Blogger with your ID.
2. Click Settings -> Publishing .
3. In the Blog*Spot Address , fill in the name of the blog you want.
4. Make a word verification. Then click Save Settings

Later the new URL you will use to access your blog.

READ MORE - How To Changing URL

How to Upload Photos

Upload an image is very useful. If we write an article, we can explain what we describe in the article that the upload photos. Photo of the future can we make the article more interesting blog. Here, I will study how to upload images


1. Log in to Blogger with your ID.

2. Click on New Post, if the picture will be included in the new article or Edit Post if you will enter the picture in the older post.

3. Click the button like this .

4. At the option Choose a layout , select None if you want the image can positioning anywhere. Select Left if you want the picture to the left positioning article, select Right if you want to image positioning on the right side of the article, and select Center if you want to image of the article.

5. In the Image Size , select Large if you want to resize the image uploading a large size, select Small if the image upload size small, and select Medium if you do not want to size too big and not too small.

6. Marked on the Use this layout every time if you want to upload the image is now used as the default settings for the next.

7. Click the Browse and locate the image you upload. The format is good for the image you upload is. Jpg.

8. Click Add Another Image if you want to upload more than one image.

9. Click Upload Image . Wait for the process, then click Done.


READ MORE - How to Upload Photos

Saturday, January 10, 2009

How to Install Statistics and Tracker Blog


This is a widget that is popular among bloggers, the blog tracker install widgets. With this widget, we can know the number of visitors, from the region and any country, from any link, whether from search engines, and other. Blog Tracker the most popular at this time is sitemeter.

How to create Sitemeter statistics in very easy. Follow this steps.


1. Visit www.sitemeter.com.
2. Click Sign Up to register.
3. Click the Next button. Then there Next button again. Click the button that also.
4. Fill in all the data required, after this section, they will ask you to fill in the some of the data. Fill in the data. Then click Next
6. Click Next -> Next.
7. Do the verification.
8. Open email from sitemeter, go with your ID.
9. Click the Manager.
10. Click on the menu for the Style Meter
11. Click HTML Code.
11. Click on the Adding site Meter to a Blogger.com Site.
12. Copy and paste the HTML code provided on the sidebar of your blog.

FINISHED!!

READ MORE - How to Install Statistics and Tracker Blog

Install Feed on the Blog

Feed on the blog? What's the feed in the blog? Feed on the blog so that the visitor is faithful to know whether there is a new article, so he does not need to open our blog to check if there is a new article or not.

Okay, I'll explain a bit about RSS feeds. RSS stands for Rich Site Summary, which means a summary of the site. But if you want to read more, just ask Google uncle, Okey =).


How do I know our blog RSS feeds? RSS feeds in Blogger are usually always use atom.xml extension. For example RSS Feed me this blog is http://blogging-trick.blogspot.com/atom.xml. Then how do I install the RSS feed in the blog? How easy one, follow these steps.

1. Log in to Blogger -> Layout -> Add Gadget -> Feed.
2. Type the address you RSS feeds. Then continue and save.
3. This step is most important, FINISHED !

READ MORE - Install Feed on the Blog

Thursday, January 8, 2009

Create Text Alert

Text Alert is a text to go out there every person who opened my blog. If you open my blog, the box will appear like this.

text alert trick blog


But many blog that is not use this trick. But if you are interested, you can install on your blog. Do not difficult, just add 1 HTML code in your template.

1. Open your HTML template and find this code.

</head>

2. Paste this code above

<SCRIPT language='JavaScript'>alert("Welcome in the Andre's Blog");</SCRIPT>

3. You can replace Text blue with anything text.
4. Save and view result.


Each visitor is to open your blog, they will receive a message such as a box on my blog.

READ MORE - Create Text Alert

Create Read More At Classic Template

If in the previous article we discussed how to create Read More on the new template, this time we discussed how to create Read More in the classic template. Okay, I will immediately know how to give it so.

1. Log in to Blogger -> Layout -> Edit HTML.
2. Paste this code above the code </style>.

<MainOrArchivePage>
div.fullpost {display:none;}
</MainOrArchivePage>
<ItemPage>
div.fullpost {display:inline;}
</ItemPage>


3. Then paste the following code under the code <$BlogItemBody$>.


<MainOrArchivePage><br/>
<a href="<$BlogItemPermalinkURL$>">Read more</a>
</MainOrArchivePage>


4. Save the template. Then go to Settings -> Formatting.
5. In the Post template, fill in the following code.


<div class="fullpost">


</div>


6. Then save.


When writing, writing that you want to display at code above <div class="fullpost"> and type of articles of the code <div class="fullpost"> and </div>.
READ MORE - Create Read More At Classic Template

Create Read More included Post Title

In tricks this time our discussed how to make Read More included with the title of the article. Read More included with the title of the article Read More is the title of the article added, such as that used it on my blog. How to make it very easy, follow these steps.

If Read More 1 on the previous code is as follows.

<b:if cond='data:blog.pageType == "item"'>

<style>.fullpost{display:inline;}</style>

<p><data:post.body/></p>

<b:else/>

<style>.fullpost{display:none;}</style>

<p><data:post.body</p>

<a expr:href='data:post.url'><strong>Read More...</strong></a>

</b:if>


View a code blue. You change the code with the following code.

<strong><a expr:href='data:post.url'>Read More    &#8220;<data:post.title/>&#8221; &#160;&#187;&#187; </a></strong>

Save your template and see the results.
READ MORE - Create Read More included Post Title

Wednesday, January 7, 2009

Tricks Adding Sidebar Width

Sometimes the blogger peeved because when install widgets in the sidebar, seemingly wide widget installed beyond the width sidebar. Of the very appearance as part of the sidebar is not visible. Hmm, the trick this time we will discuss how to widen the sidebar easily.


1. Log in to Blogger -> Layut -> Edit HTML.
2. Search word sidebar on the blog. This order is similar.

#sidebar-wrapper {
width:200px;
float:$startSide;
font-size:85%;
padding-bottom:20px;


3. See the number of blue. You can increase the value of a number if you want to broaden out and if you want to reduce the wide side of the line. But remember! If you do not want to widen too wide because it can cause the sidebar you fall down. Of course you do not want it happen. Therefore, add only as needed.

If you have immediate Save.
READ MORE - Tricks Adding Sidebar Width

Sunday, January 4, 2009

Trick Backup Blog

After I lost my blog address the free-games-mobile.blogspot.com, then I realized the importance of the backup blog. After a search in search engines, finally found the site you can also backup blog, which is in www.blogbackuponline.com. There we can backup blog for free, but only 5 megabytes. Although not large, but it is tolerable for data backup our blog. If the average of our article contains 1000 characters, then it is enough to back up to 5 post. But the free version for this we can not backup pictures and video. Can only backup blog articles. Interested? Follow the steps below.

1. Open the http://www.blogbackuponline.com site and register your blog there. After registering you will receive a verification email. Verify that you first email account is activated.
2. If the account is active, go to the website. Then list the blog address to the way you click the Start Your Blog registering.
3. Enter the blog address in the box provided and click the button Register Blog .
4.
Then watch the backup process. Then click Start Full Backup. Done.


So how do we restore the data articles? If you use version of how paying very easy, just click the Restore. But to use the free version, we will only get the data we article. Step into the Dashboard -> Manage -> Content. That is the place the data you are posting. Self-interest of the type we have to reset our articles.
READ MORE - Trick Backup Blog

Saturday, January 3, 2009

How to Create DTree Menu

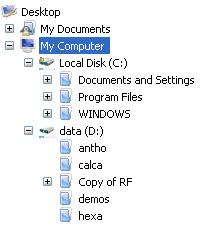
DTree menu is the menu in the tree-shaped structures that you normally see in Windows Explorer. Yes, this function menu DTree almost the same as the other menus, in order to save space that is used when we post a lot, so it looks more beautiful, but to save space.


Menu DTree form is like this.


How to make it not too difficult, following the steps.

1. Once signed in to Blogger, go to Layout -> Edit HTML. Then, paste this code under the code <head>.

<link rel="StyleSheet" href="http://www.geocities.com/uddin_81/dtree.css" type="text/css" />
<script type="text/javascript" src="http://www.geocities.com/uddin_81/dtree.js"></script>

2. Then Save.
3. After the above step, paste the following code in your sidebar. How to paste the code in the sidebar see here.

<div class="dtree">
<script type="text/javascript">
<!--
d = new dTree('d');
d.add(0,-1,'My example tree');
d.add(1,0,'Node 1','link.html');
d.add(2,1,'Node 1.1','link.html');
d.add(3,2,'Node 1.1.1','link.html');
d.add(4,3,'Node 1.1.1.1','link.html');
d.add(5,0,'Node 2','link.html');
d.add(6,5,'Node 2.1','link.html');
d.add(7,5,'Node 2.2','link.html');
d.add(8,0,'Node 3','link.html');
d.add(9,0,'Node 5','link.html');
document.write(d);
//-->
</script>
</div>


- Description: Replace the word link with the URL you post.
- The first number should be unique and can not have the same
- The second number is a branch of the first number (note the number that have the same color).
- You can also change the icon iconnya with you. Sample code will be like this.

d.add(10,0,’Profile’,’link.html’,’’,’’,’https://blogger.googleusercontent.com/img/b/R29vZ2xl/AVvXsEgC-KbOrloi8XsDitiPFH4qepbCwlBu5fePlu1XX6CxOVJI6JSQ_XpQKVBiRq_6QMnXgizlWAjRMIJ6RNXSlPKYAVfPLAqLAHXG8wdUh1afjlyRrieBu8FVaKexf-jEfFabirb7z2ILNsft/s320/dtree.JPG’);

Change the address https://blogger.googleusercontent.com/img/b/R29vZ2xl/AVvXsEgC-KbOrloi8XsDitiPFH4qepbCwlBu5fePlu1XX6CxOVJI6JSQ_XpQKVBiRq_6QMnXgizlWAjRMIJ6RNXSlPKYAVfPLAqLAHXG8wdUh1afjlyRrieBu8FVaKexf-jEfFabirb7z2ILNsft/s320/dtree.JPG picture you. Then save.

READ MORE - How to Create DTree Menu

Friday, January 2, 2009

Create Related Posts

Related Posts This is a very useful because after a visitor to read one blog posting, he was still able to read other posts related to the new post he read. This is called Related Posts. How to make it not difficult. If you are interested to put in your blog, follow the steps below.


1. Log in to Blogger -> Layout -> Edit HTML. Check the box Expand Widget Templates.

2. Find this code <data:post.body/> and replace with this code.


<b:if cond='data:blog.pageType == "item"'>
<div class='similiar'>

<div class='widget-content'>
<h3>Related Posts by Categories</h3>
<div id='data2007'/><br/><br/>
<script type='text/javascript'>

var homeUrl3 = &quot;<data:blog.homepageUrl/>&quot;;
var maxNumberOfPostsPerLabel = 4;
var maxNumberOfLabels = 10;

maxNumberOfPostsPerLabel = 100;
maxNumberOfLabels = 3;


function listEntries10(json) {
var ul = document.createElement(&#39;ul&#39;);
var maxPosts = (json.feed.entry.length &lt;= maxNumberOfPostsPerLabel) ?
json.feed.entry.length : maxNumberOfPostsPerLabel;
for (var i = 0; i &lt; maxPosts; i++) {
var entry = json.feed.entry[i];
var alturl;

for (var k = 0; k &lt; entry.link.length; k++) {
if (entry.link[k].rel == &#39;alternate&#39;) {
alturl = entry.link[k].href;
break;
}
}
var li = document.createElement(&#39;li&#39;);
var a = document.createElement(&#39;a&#39;);
a.href = alturl;

if(a.href!=location.href) {
var txt = document.createTextNode(entry.title.$t);
a.appendChild(txt);
li.appendChild(a);
ul.appendChild(li);
}
}
for (var l = 0; l &lt; json.feed.link.length; l++) {
if (json.feed.link[l].rel == &#39;alternate&#39;) {
var raw = json.feed.link[l].href;
var label = raw.substr(homeUrl3.length+13);
var k;
for (k=0; k&lt;20; k++) label = label.replace(&quot;%20&quot;, &quot; &quot;);
var txt = document.createTextNode(label);
var h = document.createElement(&#39;b&#39;);
h.appendChild(txt);
var div1 = document.createElement(&#39;div&#39;);
div1.appendChild(h);
div1.appendChild(ul);
document.getElementById(&#39;data2007&#39;).appendChild(div1);
}
}
}
function search10(query, label) {

var script = document.createElement(&#39;script&#39;);
script.setAttribute(&#39;src&#39;, query + &#39;feeds/posts/default/-/&#39;
+ label +

&#39;?alt=json-in-script&amp;callback=listEntries10&#39;);
script.setAttribute(&#39;type&#39;, &#39;text/javascript&#39;);
document.documentElement.firstChild.appendChild(script);
}

var labelArray = new Array();
var numLabel = 0;

<b:loop values='data:posts' var='post'>
<b:loop values='data:post.labels' var='label'>
textLabel = &quot;<data:label.name/>&quot;;

var test = 0;
for (var i = 0; i &lt; labelArray.length; i++)
if (labelArray[i] == textLabel) test = 1;
if (test == 0) {
labelArray.push(textLabel);
var maxLabels = (labelArray.length &lt;= maxNumberOfLabels) ?
labelArray.length : maxNumberOfLabels;
if (numLabel &lt; maxLabels) {
search10(homeUrl3, textLabel);
numLabel++;
}
}

</b:loop>
</b:loop>
</script>
</div>

</div>
</b:if>


3. Save and view results.


Related Posts post this work if you have a label. Post with the same label will be considered connected.
READ MORE - Create Related Posts

Do I Install the Meta Tag Correctly?

If we install the meta tags, there may be no question: do I install the meta tag correctly? That is a reasonable question, given that the meta tag is very important for SEO. Hmm, how do I know if we install the meta tag correctly? The following are the tools that we can use.


Namely Website SEOCentro with a http://www.seocentro.com/tools/search-engines/metatag-analyzer.html. Fill in the requested data and click Submit button. It will show results. If you have any posts red, then there is something wrong with the meta tag you. But if everything is green, it means you have to install meta tag correctly.

READ MORE - Do I Install the Meta Tag Correctly?

Thursday, January 1, 2009

Tricks Blog protect from Plagiarism

Perhaps the blogger often annoyed by the cheater created the blog. How do I not? Articles that we make with great difficulty and extort the brain and to spend time, even plagiarism by other people. Surely we will be angry and want to taste great to talk dirty. Hmm. In the trick this time will discuss how to protect blog from plagiarism.

But it is not too safe to have that experience on the internet, but a sizable plagiarist who has not been clever. Follow tricks.

1. Log in to Blogger -> Layout -> Edit HTMLM.
2. Search this code. If it is found, enter the code inside.

onmousedown="return false" oncontextmenu="return false" onselectstart="return false"

For example like this.

<body onmousedown="return false" oncontextmenu="return false" onselectstart="return false" >


The script is the script to work so that the text can not are also right-clicked. Hmm, what if the cheater see the source code of the page? We only send down the HTML script to its bottom. How open Edit HTML, you hold down the code with the code underneath HEAD up to 77 times. If you see a cheater source, he certainly did not see the HTML code because it has been revealed to the bottom.
READ MORE - Tricks Blog protect from Plagiarism

Changing Sentence Post Older / Newer Post

Perhaps you have seen the links on the blog article titled Newer Post / Older Post. The text that you can replace with another sentence, such as the Old Post / New Post.

For example, you blog contains all about computer games, you can replace with the writings "Previous Games". If you are interested, follow this trick:

1. Log in to Blogger -> Layout -> Edit HTML -> marked on Expand Widget Templates .
2. Find the following code in your HTML.

<data:newerPageTitle/>

3. Replace the code with the words that you want. Example: New Tricks.
4. To change any posts Older Post search code <data:olderPageTitle/>
and replace with the sentence that you like. If you have, click Save.

Good Luck!
READ MORE - Changing Sentence Post Older / Newer Post

Making Moving Image in the Corner Blog

Float images are animated images that floated in the corner of the blog. So beautiful impression on the blog that you have. Thus, visitors will not be bored. And what can the image that will be placed at the corner of the blog.

If you want to place them in the blog, follow these steps, but you must have the image URL that would be installed at the corner of the blog.

1. As always, log in to Blogger -> Layout -> Edit HTML.
2. Find code ]]></b:skin>. If it is found, paste the following code underneath.


#trik_pojok {
position:fixed;_position:absolute;bottom:0px; left:0px;
clip:inherit;
_top:expression(document.documentElement.scrollTop+
document.documentElement.clientHeight-this.clientHeight); _left:expression(document.documentElement.scrollLeft+ document.documentElement.clientWidth - offsetWidth); }


3. Bold text that is the location of the picture. You can change, for example, you want the image diletak in the upper right-hand corner, you live up to replace the bottom and left to right.

4. The next step is to paste this code under the code before the </body>.

<div id="trik_pojok">
<a href="http://blogging-trick.blogspot.com">
<img src="IMAGE URL" border="0" /></a>
</div>


Change http://blogging-trick.blogspot.com/ with the blog URL or the URL you what you want and you change the URL of IMG with the location of the picture. If you have saved.

Good Luck!! If not successful then you less fortunate, hahahaha
READ MORE - Making Moving Image in the Corner Blog

Back Up Template

Many of the bloggers who like to edit the HTML blog. Yes, to edit the HTML blog and we can add widget-widget on our blog template. Before you edit the HTML templates, there is a good idea if we keep a backup of the template / duplicate template. So if things happen that do not want, we can still send it back to the way back to upload the template. How to back up the template it is very easy.

You go to Layout -> Edit HTML. Then click the Download Full Template. Once we get the template file, we can more safely edit the HTML template.

READ MORE - Back Up Template