jlg 450aj merupakan cara meni
READ MORE - jlg 450aj
Showing posts with label Blog Widget. Show all posts
Showing posts with label Blog Widget. Show all posts
Thursday, May 3, 2012

Monday, March 9, 2009
Adding Social Bookmarking At End of Article
You can add a toolbar Social Bookmarking to your blog. Bookmarking the toolbar looks like this.


If a visitor feel happy with the article in your blog, it can make a bookmark in your article. This acquisition can help in the blog traffic.
You can install the toolbar Social Bookmarking on your blog. Social Bookmarking Toolbar is very useful if placed end of the article. To make this, follow these steps.
READ MORE - Adding Social Bookmarking At End of Article


If a visitor feel happy with the article in your blog, it can make a bookmark in your article. This acquisition can help in the blog traffic.
You can install the toolbar Social Bookmarking on your blog. Social Bookmarking Toolbar is very useful if placed end of the article. To make this, follow these steps.
- Log in to Blogger with your Blogger Account.
- Click Layout.
- After that, click on Edit HTML.
- Before editing the template, I suggest you backup your template first. Click Download Full Template link.
- Copy the following code before ]]></b:skin
.rsociales ul {
display:inline;
margin:0pt !important;
padding:0pt !important; }
.rsociales li {
background:transparent none repeat scroll 0%;
display:inline;
list-style-type:none;
margin:0pt;
padding:2px; }
.rsociales img {
border:0pt none;
float:none;
margin:0pt;
padding:0pt; }
.rsociales-sobre { opacity:0.4; }
.rsociales-sobre:hover { opacity:1; } - Find this code.
<data:post.body/>
Or like this.
<p><data:post.body/></p> - If it is found, copy the code below and paste it under <p><data:post.body/></p>.
<br/><a expr:href='"http://www.technorati.com/faves?add=" + data:post.url + "&title=" + data:post.title' target='_blank'><img alt='Agregar a Technorati' class='rsociales-sobre' src='https://blogger.googleusercontent.com/img/b/R29vZ2xl/AVvXsEjm1bVaMgXqMTO04rNwpwjX2e1OgKSzN66Kom2CCvkpxFg21hROw2oGVWbNuVPRMpqz1kDb7GRfTQ2j1NDmju_RNa9DGmX4rv5FSxBKS0hwptHkQOGfHN6pTqNsKcYGQgQz3DeXhQtPK7g/s1600/technorati.gif'/></a><a expr:href='"http://del.icio.us/post?url=" + data:post.url + "&title=" + data:post.title' target='_blank'><img alt='Agregar a Del.icio.us' class='rsociales-sobre' src='https://blogger.googleusercontent.com/img/b/R29vZ2xl/AVvXsEh1lH1414_zlfeWBY510ADOV99fv01DwaKNv1qetLTGOj6NQwdN5hSswGR-kWXGF84twxmMgeTUYUv__f7SE1MD-WMaST0QPMEoXmvEzwpHHG86jGI5tkOdz6th6PUkGr7cE35abDDrg6Y/s1600/delicious.gif'/></a><a expr:href='"http://digg.com/submit?phase=2&url=" + data:post.url + "&title=" + data:post.title' target='_blank'><img alt='Agregar a DiggIt!' class='rsociales-sobre' src='https://blogger.googleusercontent.com/img/b/R29vZ2xl/AVvXsEj6pYtv2YIJRUhbY2ing2274xmbw2wmT0XHJMpDngWvRv-oe4nTvDVrJ8y_5bWsodDG5yiGxgwpIkQDiVSvKA5pOtgHamoty3_MyIcBbv7QuliIQKYzQUvRXPILLa4anFg-wB2LDP-NPnk/s1600/digg.png'/></a><a expr:href='"http://myweb2.search.yahoo.com/myresults/bookmarklet?u=" + data:post.url + "&title=" + data:post.title' target='_blank'><img alt='Agregar a Yahoo!' class='rsociales-sobre' src='https://blogger.googleusercontent.com/img/b/R29vZ2xl/AVvXsEiqdgmLtYzFnV_vBGf4wtrtW50lqM3fnY8zq9zXGFRZid_JM141Z_S3k8Srb9DArNSjlR3sTag7AkPBbfvD3yxS5MmJEyeqn5lJNV3PigyKhhZh2TLitf6hM_uAKw8sMNpEKI8D1uNqwOU/s1600/yahoo.png'/></a><a expr:href='"http://www.google.com/bookmarks/mark?op=edit&output=popup&bkmk=" + data:post.url + "&title=" + data:post.title' target='_blank'><img alt='Agregar a Google' class='rsociales-sobre' src='https://blogger.googleusercontent.com/img/b/R29vZ2xl/AVvXsEjQur-Dyp3RUDZKocoDzffnJ1jLTLKIw4JzvYMOCajFjISDhxVaTzU1D-FeGXECz7PXRMZJNo2t0Zx6qe8IBT7Ox0ixKp9-TIpxknbD8folos5mTcOgEbEckUefnK42t_d9F-IIuDewBwE/s1600/google.gif'/></a><a expr:href='"http://meneame.net/submit.php?url=" + data:post.url + "&title=" + data:post.title' target='_blank'><img alt='Agregar a Meneame' class='rsociales-sobre' src='https://blogger.googleusercontent.com/img/b/R29vZ2xl/AVvXsEgJayfU6uTzk6HvKF3E5ZUqaZcOX9l6ZZOWXz8E_C7j9EhfLkLFyryjo7xJu9E1Td_1EQEmPn3YPzFB5FmzCD6Ygp92qo2yTRbhTuz2foIDn2FnJyPGuJ0Pd1vcIi5FNFGkVkt4PjJnX90/s1600/meneame.png'/></a><a expr:href='"http://www.furl.net/storeIt.jsp?u=" + data:post.url + "&title=" + data:post.title' target='_blank'><img alt='Agregar a Furl' class='rsociales-sobre' src='https://blogger.googleusercontent.com/img/b/R29vZ2xl/AVvXsEjiuh9lZZmE-VZdYvkeypJlO8XCSMrAdTfaRz_U43LRYMcG1cUpJXngl32KghnMtvXCvhzKSU88BlI2adCV9yrwmJJ02otxEnwAg-8g9yy6D3wYHukpJ-T1xsjYD1mJrXHSnJHej63xJsw/s1600/furl.png'/></a><a expr:href='"http://reddit.com/submit?url=" + data:post.url + "&title=" + data:post.title' target='_blank'><img alt='Agregar a Reddit' class='rsociales-sobre' src='https://blogger.googleusercontent.com/img/b/R29vZ2xl/AVvXsEjKxeoBPJtHiiavs5EiMy9aDzwJpVe5KqU3BfJKcQFal5m_UbLpz5QSKRgLBkkl1h0dQx3ocsIO-3ebCCuXwiBFOB4uFsLZOhmREcdZjBagTbxCs3x3sfccZxddOHJWViIbUUSG5La06v4/s1600/reddit.gif'/></a><a expr:href='"http://ma.gnolia.com/beta/bookmarklet/add?url=" + data:post.url + "&title=" + data:post.title' target='_blank'><img alt='Agregar a Magnolia' class='rsociales-sobre' src='https://blogger.googleusercontent.com/img/b/R29vZ2xl/AVvXsEgxNwYz-iSig0fTR6f0H6SUJdc9FSM0Kzw2fnZ25yCgzFiabg1anIeW_seWbd9DEPSG9XfLd4-36T2DUekMvsX9QH8blagdFvpDYmF0M2BnqzRYs2kcf_iVzV-ecQ_Ap5xPSbtZIP2GxVA/s1600/magnolia.gif'/></a><a expr:href='"http://www.blinklist.com/index.php?Action=Blink/addblink.php&Description=&Url=" + data:post.url + "&title=" + data:post.title' target='_blank'><img alt='Agregar a Blinklist' class='rsociales-sobre' src='https://blogger.googleusercontent.com/img/b/R29vZ2xl/AVvXsEgo-fUIla8J9wa4q4VdVgcbYhgtlRk5-9ZYfctzxCOPq2Lwl40Y68QypF11OuaKepb7fiKZJ4k3skA2RO-H7OnLkIIZecB0w_NzEcGPS0S639ts8dMHWShKi7Artrah2gbC7xS3F_xU0YE/s1600/blinklists.gif'/></a><a expr:href='"http://blogmarks.net/my/new.php?mini=1&simple=1&url=" + data:post.url + "&title=" + data:post.title' target='_blank'><img alt='Agregar a Blogmarks' class='rsociales-sobre' src='https://blogger.googleusercontent.com/img/b/R29vZ2xl/AVvXsEgTzgPCdzcc0r45oJSrYnpuyUbfIGK-MMVbULB88BtXGLvmQX59TeNpCgMLXMIBXsJZahOFY0bDZLMpCkZeiOhJzLyGtSuzbGAvCaJDoM6xUY-8eEbEpxe_XF-B24IhiAYE6HMzAGUf_PQ/s1600/blogmarks.gif'/></a><a expr:href='"http://www.facebook.com/sharer.php?u=" + data:post.url + "&title=" + data:post.title' target='_blank'><img alt='Agregar a facebook' class='rsociales-sobre' src='http://lh5.ggpht.com/jaloee/SJNIyWWQmEI/AAAAAAAACRY/4GVE3Qxqg34/facebook.gif'/></a><a expr:href='"http://twitter.com/home?status=" + data:post.url + "&title=" + data:post.title' target='_blank'><img alt='Agregar a twitter' class='rsociales-sobre' src='http://lh6.ggpht.com/jaloee/SJNIyl7oKlI/AAAAAAAACRc/8cc7q_upZI4/twitter.gif'/></a><a expr:href='"http://jaloee.multiply.com/journal/compose?body=" + data:post.url + "&title=" + data:post.title' target='_blank'><img alt='multifly' class='rsociales-sobre' src='http://lh3.ggpht.com/jaloee/SJNKClcp6NI/AAAAAAAACRk/Dk1jtkOXECo/multiply.png'/></a> - So the code structure be like this.
<data:post.body/>
<br/><a expr:href='"http://www.technorati.com/faves?add=" + data:post.url + "&title=" + data:post.title' target='_blank'><img alt='Agregar a Technorati' class='rsociales-sobre' src='https://blogger.googleusercontent.com/img/b/R29vZ2xl/AVvXsEjm1bVaMgXqMTO04rNwpwjX2e1OgKSzN66Kom2CCvkpxFg21hROw2oGVWbNuVPRMpqz1kDb7GRfTQ2j1NDmju_RNa9DGmX4rv5FSxBKS0hwptHkQOGfHN6pTqNsKcYGQgQz3DeXhQtPK7g/s1600/technorati.gif'/></a><a expr:href='"http://del.icio.us/post?url=" + data:post.url + "&title=" + data:post.title' target='_blank'><img alt='Agregar a Del.icio.us' class='rsociales-sobre' src='https://blogger.googleusercontent.com/img/b/R29vZ2xl/AVvXsEh1lH1414_zlfeWBY510ADOV99fv01DwaKNv1qetLTGOj6NQwdN5hSswGR-kWXGF84twxmMgeTUYUv__f7SE1MD-WMaST0QPMEoXmvEzwpHHG86jGI5tkOdz6th6PUkGr7cE35abDDrg6Y/s1600/delicious.gif'/></a><a expr:href='"http://digg.com/submit?phase=2&url=" + data:post.url + "&title=" + data:post.title' target='_blank'><img alt='Agregar a DiggIt!' class='rsociales-sobre' src='https://blogger.googleusercontent.com/img/b/R29vZ2xl/AVvXsEj6pYtv2YIJRUhbY2ing2274xmbw2wmT0XHJMpDngWvRv-oe4nTvDVrJ8y_5bWsodDG5yiGxgwpIkQDiVSvKA5pOtgHamoty3_MyIcBbv7QuliIQKYzQUvRXPILLa4anFg-wB2LDP-NPnk/s1600/digg.png'/></a><a expr:href='"http://myweb2.search.yahoo.com/myresults/bookmarklet?u=" + data:post.url + "&title=" + data:post.title' target='_blank'><img alt='Agregar a Yahoo!' class='rsociales-sobre' src='https://blogger.googleusercontent.com/img/b/R29vZ2xl/AVvXsEiqdgmLtYzFnV_vBGf4wtrtW50lqM3fnY8zq9zXGFRZid_JM141Z_S3k8Srb9DArNSjlR3sTag7AkPBbfvD3yxS5MmJEyeqn5lJNV3PigyKhhZh2TLitf6hM_uAKw8sMNpEKI8D1uNqwOU/s1600/yahoo.png'/></a><a expr:href='"http://www.google.com/bookmarks/mark?op=edit&output=popup&bkmk=" + data:post.url + "&title=" + data:post.title' target='_blank'><img alt='Agregar a Google' class='rsociales-sobre' src='https://blogger.googleusercontent.com/img/b/R29vZ2xl/AVvXsEjQur-Dyp3RUDZKocoDzffnJ1jLTLKIw4JzvYMOCajFjISDhxVaTzU1D-FeGXECz7PXRMZJNo2t0Zx6qe8IBT7Ox0ixKp9-TIpxknbD8folos5mTcOgEbEckUefnK42t_d9F-IIuDewBwE/s1600/google.gif'/></a><a expr:href='"http://meneame.net/submit.php?url=" + data:post.url + "&title=" + data:post.title' target='_blank'><img alt='Agregar a Meneame' class='rsociales-sobre' src='https://blogger.googleusercontent.com/img/b/R29vZ2xl/AVvXsEgJayfU6uTzk6HvKF3E5ZUqaZcOX9l6ZZOWXz8E_C7j9EhfLkLFyryjo7xJu9E1Td_1EQEmPn3YPzFB5FmzCD6Ygp92qo2yTRbhTuz2foIDn2FnJyPGuJ0Pd1vcIi5FNFGkVkt4PjJnX90/s1600/meneame.png'/></a><a expr:href='"http://www.furl.net/storeIt.jsp?u=" + data:post.url + "&title=" + data:post.title' target='_blank'><img alt='Agregar a Furl' class='rsociales-sobre' src='https://blogger.googleusercontent.com/img/b/R29vZ2xl/AVvXsEjiuh9lZZmE-VZdYvkeypJlO8XCSMrAdTfaRz_U43LRYMcG1cUpJXngl32KghnMtvXCvhzKSU88BlI2adCV9yrwmJJ02otxEnwAg-8g9yy6D3wYHukpJ-T1xsjYD1mJrXHSnJHej63xJsw/s1600/furl.png'/></a><a expr:href='"http://reddit.com/submit?url=" + data:post.url + "&title=" + data:post.title' target='_blank'><img alt='Agregar a Reddit' class='rsociales-sobre' src='https://blogger.googleusercontent.com/img/b/R29vZ2xl/AVvXsEjKxeoBPJtHiiavs5EiMy9aDzwJpVe5KqU3BfJKcQFal5m_UbLpz5QSKRgLBkkl1h0dQx3ocsIO-3ebCCuXwiBFOB4uFsLZOhmREcdZjBagTbxCs3x3sfccZxddOHJWViIbUUSG5La06v4/s1600/reddit.gif'/></a><a expr:href='"http://ma.gnolia.com/beta/bookmarklet/add?url=" + data:post.url + "&title=" + data:post.title' target='_blank'><img alt='Agregar a Magnolia' class='rsociales-sobre' src='https://blogger.googleusercontent.com/img/b/R29vZ2xl/AVvXsEgxNwYz-iSig0fTR6f0H6SUJdc9FSM0Kzw2fnZ25yCgzFiabg1anIeW_seWbd9DEPSG9XfLd4-36T2DUekMvsX9QH8blagdFvpDYmF0M2BnqzRYs2kcf_iVzV-ecQ_Ap5xPSbtZIP2GxVA/s1600/magnolia.gif'/></a><a expr:href='"http://www.blinklist.com/index.php?Action=Blink/addblink.php&Description=&Url=" + data:post.url + "&title=" + data:post.title' target='_blank'><img alt='Agregar a Blinklist' class='rsociales-sobre' src='https://blogger.googleusercontent.com/img/b/R29vZ2xl/AVvXsEgo-fUIla8J9wa4q4VdVgcbYhgtlRk5-9ZYfctzxCOPq2Lwl40Y68QypF11OuaKepb7fiKZJ4k3skA2RO-H7OnLkIIZecB0w_NzEcGPS0S639ts8dMHWShKi7Artrah2gbC7xS3F_xU0YE/s1600/blinklists.gif'/></a><a expr:href='"http://blogmarks.net/my/new.php?mini=1&simple=1&url=" + data:post.url + "&title=" + data:post.title' target='_blank'><img alt='Agregar a Blogmarks' class='rsociales-sobre' src='https://blogger.googleusercontent.com/img/b/R29vZ2xl/AVvXsEgTzgPCdzcc0r45oJSrYnpuyUbfIGK-MMVbULB88BtXGLvmQX59TeNpCgMLXMIBXsJZahOFY0bDZLMpCkZeiOhJzLyGtSuzbGAvCaJDoM6xUY-8eEbEpxe_XF-B24IhiAYE6HMzAGUf_PQ/s1600/blogmarks.gif'/></a><a expr:href='"http://www.facebook.com/sharer.php?u=" + data:post.url + "&title=" + data:post.title' target='_blank'><img alt='Agregar a facebook' class='rsociales-sobre' src='http://lh5.ggpht.com/jaloee/SJNIyWWQmEI/AAAAAAAACRY/4GVE3Qxqg34/facebook.gif'/></a><a expr:href='"http://twitter.com/home?status=" + data:post.url + "&title=" + data:post.title' target='_blank'><img alt='Agregar a twitter' class='rsociales-sobre' src='http://lh6.ggpht.com/jaloee/SJNIyl7oKlI/AAAAAAAACRc/8cc7q_upZI4/twitter.gif'/></a><a expr:href='"http://jaloee.multiply.com/journal/compose?body=" + data:post.url + "&title=" + data:post.title' target='_blank'><img alt='multifly' class='rsociales-sobre' src='http://lh3.ggpht.com/jaloee/SJNKClcp6NI/AAAAAAAACRk/Dk1jtkOXECo/multiply.png'/></a> - Then click Save Template
Install Feed With Marquee Effect
If we install the feed in the blog, we can provide marquee effect on feed, so feed it to move. This will make it more dynamic. To install a Marquee effect on feed, we need to edit your blog template. If you are interested to install on your blog, follow the steps below.
Need to know in that, the marquee code will less good if viewed in a browser mozilla, this code works well when viewed on the internet explorer browser.
READ MORE - Install Feed With Marquee Effect
- Log in with your BLogger account.
- Go to Layout.
- Click Page Element.
- Select Feed.
- Type your Blog Feed Address in the blank box beside URL Feed. Example your blog address is http://andreas.blogspot.com, than your Feed URL is http://andreas.com/atom.xml.
- Click Save Changes.
- Next Steps is make marquee effect in yoru template.
- Click Edit HTML.
- Mark on Expand Template Widget.
- Find this code.
<b:widget id='Feed1' locked='false' title='Recent Post' type='Feed'>
<b:includable id='main'>
<h2><data:title/></h2>
<div class='widget-content'>
<ul expr:id='data:widget.instanceId + "_feedItemListDisplay"'>
<b:loop values='data:feedData.items' var='i'>
<li>
<span class='item-title'>
<a expr:href='data:i.alternate.href'>
<data:i.title/>
</a>
</span>
<b:if cond='data:showItemDate'>
<b:if cond='data:i.str_published != ""'>
<span class='item-date'>
 - <data:i.str_published/>
</span>
</b:if>
</b:if>
<b:if cond='data:showItemAuthor'>
<b:if cond='data:i.author != ""'>
<span class='item-author'>
 - <data:i.author/>
</span>
</b:if>
</b:if>
</li>
</b:loop>
</ul>
<b:include name='quickedit'/>
</div>
</b:includable>
</b:widget> - Add marquee code as shown below.
<b:widget id='Feed1' locked='false' title='Recent Post' type='Feed'>
<b:includable id='main'>
<h2><data:title/></h2>
<marquee align='center' direction='up' height='150' onmouseout='this.start()' onmouseover='this.stop()' scrollamount='2' width='100%'>
<div class='widget-content'>
<ul expr:id='data:widget.instanceId + "_feedItemListDisplay"'>
<b:loop values='data:feedData.items' var='i'>
<li>
<span class='item-title'>
<a expr:href='data:i.alternate.href'>
<data:i.title/>
</a>
</span>
<b:if cond='data:showItemDate'>
<b:if cond='data:i.str_published != ""'>
<span class='item-date'>
 - <data:i.str_published/>
</span>
</b:if>
</b:if>
<b:if cond='data:showItemAuthor'>
<b:if cond='data:i.author != ""'>
<span class='item-author'>
 - <data:i.author/>
</span>
</b:if>
</b:if>
</li>
</b:loop>
</ul>
<b:include name='quickedit'/>
</div>
</marquee>
</b:includable>
</b:widget> - Click Save Template button.
- Finished.
Need to know in that, the marquee code will less good if viewed in a browser mozilla, this code works well when viewed on the internet explorer browser.
Email Form Subscriber Placed Under Post
I am sure you already know about the Email Form Subscriber. Now I will explain how to put this widget blog under your article. Very easy to do. See the code below.
<form action='http://feedburner.google.com/fb/a/mailverify' id='subscribe' method='post' onsubmit='window.open('http://feedburner.google.com/fb/a/mailverify?uri=kangandre', 'popupwindow', 'scrollbars=yes,width=550,height=520');return true' target='popupwindow'><input id='subbox' name='email' onblur='if (this.value == '') {this.value = 'Insert Your Email Address';}' onfocus='if (this.value == 'Insert Your Email Address') {this.value = '';}' type='text' value='Insert Your Email Address'/><input name='uri' type='hidden' value='kangandre'/><br/><input name='loc' type='hidden' value=''/><input id='subbutton' type='submit' value='Subscribe'/></form>
That is an example of HTML code from Subscriber Email Form that I have. So that the widgets that can appear under the blog posting to us, follow the steps below.
Now go to your blog articles and at the bottom of the article will look your Email Form Subscriber. Ok, happy blogging!!!
READ MORE - Email Form Subscriber Placed Under Post
<form action='http://feedburner.google.com/fb/a/mailverify' id='subscribe' method='post' onsubmit='window.open('http://feedburner.google.com/fb/a/mailverify?uri=kangandre', 'popupwindow', 'scrollbars=yes,width=550,height=520');return true' target='popupwindow'><input id='subbox' name='email' onblur='if (this.value == '') {this.value = 'Insert Your Email Address';}' onfocus='if (this.value == 'Insert Your Email Address') {this.value = '';}' type='text' value='Insert Your Email Address'/><input name='uri' type='hidden' value='kangandre'/><br/><input name='loc' type='hidden' value=''/><input id='subbutton' type='submit' value='Subscribe'/></form>
That is an example of HTML code from Subscriber Email Form that I have. So that the widgets that can appear under the blog posting to us, follow the steps below.
- Log in with your Blogspot account.
- Go to Layout
- Go to Edit HTML.
- Mark on Expand Template Widget.
- Find this code in your template.
<p><data.post:body/></p> - Paste your Email Form Subscriber code under <p><data.post:body/></p>. Example like this.
<p><data.post:body/></p>
<form action='http://feedburner.google.com/fb/a/mailverify' id='subscribe' method='post' onsubmit='window.open('http://feedburner.google.com/fb/a/mailverify?uri=kangandre', 'popupwindow', 'scrollbars=yes,width=550,height=520');return true' target='popupwindow'><input id='subbox' name='email' onblur='if (this.value == '') {this.value = 'Insert Your Email Address';}' onfocus='if (this.value == 'Insert Your Email Address') {this.value = '';}' type='text' value='Insert Your Email Address'/><input name='uri' type='hidden' value='kangandre'/><br/><input name='loc' type='hidden' value=''/><input id='subbutton' type='submit' value='Subscribe'/></form> - Your job is not complete. Email Subscriber Form so that this does not huddle with the blog article, we give "Enter" effect with add <br/> as much twice, so that the results be like this.
<p><data.post:body/></p>
<br/><br/><form action='http://feedburner.google.com/fb/a/mailverify' id='subscribe' method='post' onsubmit='window.open('http://feedburner.google.com/fb/a/mailverify?uri=kangandre', 'popupwindow', 'scrollbars=yes,width=550,height=520');return true' target='popupwindow'><input id='subbox' name='email' onblur='if (this.value == '') {this.value = 'Insert Your Email Address';}' onfocus='if (this.value == 'Insert Your Email Address') {this.value = '';}' type='text' value='Insert Your Email Address'/><input name='uri' type='hidden' value='kangandre'/><br/><input name='loc' type='hidden' value=''/><input id='subbutton' type='submit' value='Subscribe'/></form> - Then click Save Template
Now go to your blog articles and at the bottom of the article will look your Email Form Subscriber. Ok, happy blogging!!!
Saturday, March 7, 2009
Show Recent Post
In blogging, you may want to show you the latest posting appropriate amount specified. 5 For example, you want to show you the latest posting, then every 5 post that is created, will be considered the latest posting. Then 5 posts will be organized into a list of links. How do I make it? To make it, follow steps below.
1. Login to Blogger --> Layout --> Add Gadget --> HTML/Javascript.
<script src="http://www.geocities.com/uddin_81/recent-post.js"></script>
<script>var numposts = 10; var showpostdate = false; var showpostsummary = false; var numchars = 100; </script>
<script src="http://YOURBLOGNAME.blogspot.com/feeds/posts/default?orderby=published&alt=json-in-script&callback=rp">
</script>
Amount of 10 is the number of post you want to display. Also replace YOURBLOGNAME with your blog name.
READ MORE - Show Recent Post
1. Login to Blogger --> Layout --> Add Gadget --> HTML/Javascript.
<script src="http://www.geocities.com/uddin_81/recent-post.js"></script>
<script>var numposts = 10; var showpostdate = false; var showpostsummary = false; var numchars = 100; </script>
<script src="http://YOURBLOGNAME.blogspot.com/feeds/posts/default?orderby=published&alt=json-in-script&callback=rp">
</script>
Amount of 10 is the number of post you want to display. Also replace YOURBLOGNAME with your blog name.
Friday, March 6, 2009
Make Widget Under Header
Many bloggers who want to add a widget in the bottom of the blog title. There who want to add a horizontal widget adsense ads, which have also wanted to show the other menus. If you are interested to add the widget under the title of your blog, follow these steps.
Usually we can only install widgets on the post. Only along the length of the post. If the header can be longer. If you want to make it, follow the following tricks:
1. Log in to Blogger --> Edit HTML --> Expand Template Widget.
2. Find this code:
<b:section class='header' id='header' maxwidgets='1' showaddelement='no'>
3. If found, replace the above code with the following code:
<b:section class='header' id='header' preferred='yes'>
4. Click Save.
5. Click the Page Elements and will have to add a widget box right under the header.
Good LUCK!!!
READ MORE - Make Widget Under Header
Usually we can only install widgets on the post. Only along the length of the post. If the header can be longer. If you want to make it, follow the following tricks:
1. Log in to Blogger --> Edit HTML --> Expand Template Widget.
2. Find this code:
<b:section class='header' id='header' maxwidgets='1' showaddelement='no'>
3. If found, replace the above code with the following code:
<b:section class='header' id='header' preferred='yes'>
4. Click Save.
5. Click the Page Elements and will have to add a widget box right under the header.
Good LUCK!!!
Showing Latest Comments/Recent Comments
Showing latest comments useful because our know that there are people who commented on our blog and in the where the post. Many blogger are already using this widget on their blog, but many are not using it because they do not know how to create a widget like this. How to make are as follows:
1. Log in to Blogger -> Layout -> Add Gadget -> HTML / Javascript.
2. Paste this code.
<script style="text/javascript" src="http://kendhin.890m.com/comments.js"></script><script style="text/javascript">var a_rc=8;var m_rc=false;var n_rc=true;var o_rc=40;</script><script src="http://blogging-trick.blogspot.com/feeds/comments/default?alt=json-in-script&callback=showrecentcomments"> </script>
Number 8 is the limit of the number of comments that want to display and blogging-trick.blogspot.com, you can replace with the URL what you want.
READ MORE - Showing Latest Comments/Recent Comments
1. Log in to Blogger -> Layout -> Add Gadget -> HTML / Javascript.
2. Paste this code.
<script style="text/javascript" src="http://kendhin.890m.com/comments.js"></script><script style="text/javascript">var a_rc=8;var m_rc=false;var n_rc=true;var o_rc=40;</script><script src="http://blogging-trick.blogspot.com/feeds/comments/default?alt=json-in-script&callback=showrecentcomments"> </script>
Number 8 is the limit of the number of comments that want to display and blogging-trick.blogspot.com, you can replace with the URL what you want.
Showing Online/Offline YM Status
Tricks this time discussing how this status to make online / offline YM show on our blog. With this widget, visitor know whether we are online or not. If they know, they can send a message to us.
Status look as image. If our YM status is online, the picture will be like this:

But if the status of our YM offline, or you are not currently logged in at YM, the image is like this:

If you want to add this widget to your blog, will very easy. You need copy this script and paste in your sidebar:
<a href="ymsgr:sendIM?
">ndre_as_jrockstar"> <img src="http://opi.yahoo.com/online?u=ndre_as_jrockstar&m=g&t=1&l=us"/>
</a>
Replace the word with the name of YM ndre_as_jrockstar you. Meanwhile, the number 2 can you change with whatever image adjust status.
READ MORE - Showing Online/Offline YM Status
Status look as image. If our YM status is online, the picture will be like this:
But if the status of our YM offline, or you are not currently logged in at YM, the image is like this:
If you want to add this widget to your blog, will very easy. You need copy this script and paste in your sidebar:
<a href="ymsgr:sendIM?
">ndre_as_jrockstar"> <img src="http://opi.yahoo.com/online?u=ndre_as_jrockstar&m=g&t=1&l=us"/>
</a>
Replace the word with the name of YM ndre_as_jrockstar you. Meanwhile, the number 2 can you change with whatever image adjust status.
Thursday, March 5, 2009
Add a Prayer Times Into Blog
Hello readers! How are you? I hope you are OK. Now I will ask: Are you moslem? If you are moslem, I think you will be interested to add a Prayer Times widget into your blog. Very easy to do. Currently, many sites that provide prayer times widget you can place it on the blog for free. Examples are www.islamicfinder.com. To add a widget in the prayer schedule your blog, follow the instructions below.
Ok, now you can see your prayer times widget in your blog. Ok, I hope this article was useful for those of you who read.
READ MORE - Add a Prayer Times Into Blog
- Go to www.islamicfinder.org.
- See the bottom of the page. Then click Add New Service to Your Site.
- View on No.2. Click Dropdown menu with the Select a Country text.
- Select a country you want. If you live in Saudi Arabia, select Saudi Arabia. Then click Go.
- After selecting a country, you must select the city you want. Example: New York. Then click Generate code.
- Copy all the code. Then paste it in your blog sidebar. If you do not know how to install the widget to the sidebar, then I suggest you read this article.
Ok, now you can see your prayer times widget in your blog. Ok, I hope this article was useful for those of you who read.
Wednesday, March 4, 2009
Add a Shoutbox Chat Widget
Shoutbox comment box is very interesting because we can post a comment without official identity (such as email address, your blog). We can make the fictitious identity not official. Also looks interesting.
Terrible can be used as a chat box so that your blog visitors can interact with one another using this Shoutbox.
If you are interested in installing the blog, follow these steps.
1. Open http://www.shoutmix.com.
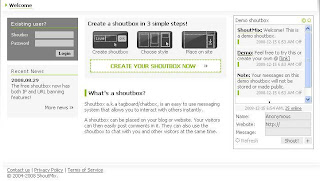
2. Click the Create your own Shoutbox Now .
3. On Shoutbox ID , fill in your name Shoutbox. Shoutbox ID is also used to log on the next Shoutmix .
Type the password that you want to log on Choose a password: .

Type the same password on Retype Password . In the Contact Information , enter your name and your email address. Check the option I have read and agree to the Terms of Service . Then click Continue.
4.In the next step, select appropriate shoutbox model taste. Then cickContinue.

5. Congratulations! Step you stay a little longer. Click Go To My Control Panel Now at the bottom right of the page.

6. Search the Quick Start and click Get Codes .

7.Copy the code provided. You can also edit it in the Witdh and Height .
8. To display it in the blog, click the Layout tab.
9. Click the Add Gadget .
10. In the options, select HTML / JavaScript .

11. Paste the code was copied on the empty box provided. Click Save and see the results.

READ MORE - Add a Shoutbox Chat Widget
Terrible can be used as a chat box so that your blog visitors can interact with one another using this Shoutbox.
If you are interested in installing the blog, follow these steps.
1. Open http://www.shoutmix.com.
2. Click the Create your own Shoutbox Now .
3. On Shoutbox ID , fill in your name Shoutbox. Shoutbox ID is also used to log on the next Shoutmix .
Type the password that you want to log on Choose a password: .
Type the same password on Retype Password . In the Contact Information , enter your name and your email address. Check the option I have read and agree to the Terms of Service . Then click Continue.
4.In the next step, select appropriate shoutbox model taste. Then cickContinue.
5. Congratulations! Step you stay a little longer. Click Go To My Control Panel Now at the bottom right of the page.
6. Search the Quick Start and click Get Codes .
7.Copy the code provided. You can also edit it in the Witdh and Height .
8. To display it in the blog, click the Layout tab.
9. Click the Add Gadget .
10. In the options, select HTML / JavaScript .
11. Paste the code was copied on the empty box provided. Click Save and see the results.

Adding Clock Widget On Blog
How does it taste if you do not have a clock? Maybe I can not imagine in the longer, how they become unruly, the schedule that we become not accordance with schedule, all can not come on time, with the promise of our people will also fail. So important for us to show time.
Now, we are not difficult to find a tool this time, try to see almost all the houses always have a day of more than one. Electronic tools are always equipped with a clock, such as mobile phones, calculators, radio, and many more, and probably will continue to grow.
The following clock, its image code.

<embed src="http://www.freewebtown.com/zawa/aksesorisblog/zawablogbiasa_9.swf" width="120" height="120" menu="false" quality="high" wmode="transparent" type="application/x-shockwave-flash" pluginspage="http://www.macromedia.com/go/getflashplayer/"></embed>

<embed src="http://www.freewebtown.com/zawa/aksesorisblog/zawablogbiasa_8.swf" width="120" height="120" menu="false" quality="high" wmode="transparent" type="application/x-shockwave-flash" pluginspage="http://www.macromedia.com/go/getflashplayer/"></embed>
And that this is a clock to perhaps more modern, that is accompanied by a digital clock or calendar date. Who want to place this? It's up to you, you select a favorite, you choose in the same store. but this is free.
<script src="http://www.clocklink.com/embed.js"></script><script language="JavaScript" type="text/javascript">obj=new Object;obj.clockfile="5015-green.swf";obj.TimeZone="GMT0700";obj.width=160;obj.height=40;obj.wmode="transparent";showClock(obj);</script>
This is also good.
<embed src="http://www.freewebtown.com/zawa/aksesorisblog/zawabloglucu_2.swf" width="120" height="120" menu="false" quality="high" wmode="transparent" type="application/x-shockwave-flash" pluginspage="http://www.macromedia.com/go/getflashplayer/"></embed>
For other clock, just ask Google uncle, OK!
READ MORE - Adding Clock Widget On Blog
Now, we are not difficult to find a tool this time, try to see almost all the houses always have a day of more than one. Electronic tools are always equipped with a clock, such as mobile phones, calculators, radio, and many more, and probably will continue to grow.
The following clock, its image code.
<embed src="http://www.freewebtown.com/zawa/aksesorisblog/zawablogbiasa_9.swf" width="120" height="120" menu="false" quality="high" wmode="transparent" type="application/x-shockwave-flash" pluginspage="http://www.macromedia.com/go/getflashplayer/"></embed>

<embed src="http://www.freewebtown.com/zawa/aksesorisblog/zawablogbiasa_8.swf" width="120" height="120" menu="false" quality="high" wmode="transparent" type="application/x-shockwave-flash" pluginspage="http://www.macromedia.com/go/getflashplayer/"></embed>
And that this is a clock to perhaps more modern, that is accompanied by a digital clock or calendar date. Who want to place this? It's up to you, you select a favorite, you choose in the same store. but this is free.
<script src="http://www.clocklink.com/embed.js"></script><script language="JavaScript" type="text/javascript">obj=new Object;obj.clockfile="5015-green.swf";obj.TimeZone="GMT0700";obj.width=160;obj.height=40;obj.wmode="transparent";showClock(obj);</script>
This is also good.
<embed src="http://www.freewebtown.com/zawa/aksesorisblog/zawabloglucu_2.swf" width="120" height="120" menu="false" quality="high" wmode="transparent" type="application/x-shockwave-flash" pluginspage="http://www.macromedia.com/go/getflashplayer/"></embed>
For other clock, just ask Google uncle, OK!
How to Install Widget Into Sidebar
Sometimes beginners blogger are confused about how to install widgets on the blog sidebar. For example, you want to install the widget translator, but does not know how to put the HTML code in the sidebar.
This information may already know that many, but there are beginner blogger who does not know. So I will explain here.
1. Go to Layout.
2. Select the Add a Gadget.
3. Choose gadget that will be installed, for example, the HTML code translator widget, select HTML / Javascript.
4. In the box provided, you paste the HTML / Javascript code. Then save and see the results.
Happy trying!!! See you in my next post!!!
READ MORE - How to Install Widget Into Sidebar
This information may already know that many, but there are beginner blogger who does not know. So I will explain here.
1. Go to Layout.
2. Select the Add a Gadget.
3. Choose gadget that will be installed, for example, the HTML code translator widget, select HTML / Javascript.
4. In the box provided, you paste the HTML / Javascript code. Then save and see the results.
Happy trying!!! See you in my next post!!!
Make a DropDown Menu
Drop Down Menu? What is the Drop Down Menu? Drop Down menu is the menu like this:
Already know? Certainly is. Continue what function this dropdown menu? Many.
With the drop down menu, you can save this page so that the space is not long down and save the text links to other posts. You can fill with whatever you want. It can also list for blogrol. How? Interested? If interested please follow the steps below.
1. Login to Blogger , click Layout -> Add Gadget -> HTML / Javascript .
2. Enter this code:
<select onChange="document.location.href=this.options[this.selectedIndex].value;">
<option value="0" selected>Pilih Trik</option>
<option value="Link ">Teks 1</option>
<option value="Link 1">Teks2</option>
</select>
On the link 1, you can fill in the destination URL, and Text can be replaced with a URL wrapper.
To extend the menu, just duplicate code <option value="Link 1">Teks2</option> , but remember duplicate still ended with
</select>
READ MORE - Make a DropDown Menu
Already know? Certainly is. Continue what function this dropdown menu? Many.
With the drop down menu, you can save this page so that the space is not long down and save the text links to other posts. You can fill with whatever you want. It can also list for blogrol. How? Interested? If interested please follow the steps below.
1. Login to Blogger , click Layout -> Add Gadget -> HTML / Javascript .
2. Enter this code:
<select onChange="document.location.href=this.options[this.selectedIndex].value;">
<option value="0" selected>Pilih Trik</option>
<option value="Link ">Teks 1</option>
<option value="Link 1">Teks2</option>
</select>
On the link 1, you can fill in the destination URL, and Text can be replaced with a URL wrapper.
To extend the menu, just duplicate code <option value="Link 1">Teks2</option> , but remember duplicate still ended with
</select>
Adding a Translator Widget to Blog
Google continues to develop its services only in the virtual world. Google is now also provide a translator widget that can be installed in our blog. Widgets translator  ? Have translators period widget? Yes, that now have a translator widget. I also was not believed, but after I checked, there was. The blog was indonesian language, can be an English or other languages with just one click. This widget was created by Google.
Interesting is not? Should I continue to install in our blog? Follow these steps
1. Visit http://translate.google.com. Click Tools
2. Select your primary blog language at Select the language your web page: in the part .
3. Highlight the code and saln provided, and paste in your sidebar. Do not know how to paste the widget in the sidebar? This open discussion.
4. Open your blog, See the results and test this widget.
Ok, i hope you will enjoy your translator!!!!!
READ MORE - Adding a Translator Widget to Blog
? Have translators period widget? Yes, that now have a translator widget. I also was not believed, but after I checked, there was. The blog was indonesian language, can be an English or other languages with just one click. This widget was created by Google.Interesting is not? Should I continue to install in our blog? Follow these steps
1. Visit http://translate.google.com. Click Tools
2. Select your primary blog language at Select the language your web page: in the part .
3. Highlight the code and saln provided, and paste in your sidebar. Do not know how to paste the widget in the sidebar? This open discussion.
4. Open your blog, See the results and test this widget.
Ok, i hope you will enjoy your translator!!!!!
Make a Text Area
You know what the text area? The text area is the text placed in a special box. To make you better understand, I will show to you an example to the text area.
Do you already understand about the text area? I hope you understand what that text area. In the text area, you can display whatever text you want. If you have a blog banner, then you can install the banner code from your blog in the text area. So if there is a blogger who want to do the link exchange with you, that bloggers only need to copy the HTML code of your blog's banner and paste into sidebar/blogroll list.
To make a text area, this is the HTML code that is used
<textarea name="textarea" cols="20"><a href="http://blogging-trick.blogspot.com">type what you want here </a></textarea>
Change blogging trick.blogspot.com with your blog URL. Change type what you want here and type with what you want
Ok, good luck!!!
READ MORE - Make a Text Area
Do you already understand about the text area? I hope you understand what that text area. In the text area, you can display whatever text you want. If you have a blog banner, then you can install the banner code from your blog in the text area. So if there is a blogger who want to do the link exchange with you, that bloggers only need to copy the HTML code of your blog's banner and paste into sidebar/blogroll list.
To make a text area, this is the HTML code that is used
<textarea name="textarea" cols="20"><a href="http://blogging-trick.blogspot.com">type what you want here </a></textarea>
Change blogging trick.blogspot.com with your blog URL. Change type what you want here and type with what you want
Ok, good luck!!!
Monday, March 2, 2009
Make a Scroll Widget to Blog
Hello friend! We met again in the Tips and TRICKS! At this time we will discuss how to create elements of the scroll. Suppose you want to install the ad, you simply enter in the elements. With elements using scroll, then we can save our space blog page. Very easy to do, follow these steps.
You only need to use this code.
<div style="overflow:auto;width:400px;height:50px;padding:10px;border:1px solid #eee">
Put what you want here!
</div>
Example:
<div style="overflow:auto;width:300px;height:50px;padding:10px;border:1px solid #eee">
<a href="http://www.kampanyedamaiindonesiapemilu2009.co.cc">Kampanye Damai Indonesia</a>
<a href="http://translate.google.com">Google Translate</a><br>
<a href="http://www.co.cc/?id=162555">Free Domain</a><br>
<a href="http://cheap-tutorial.blogspot.com/search/label/Blogspot%20Tutorial?max-results=150">Blogspot Tutorial</a><br>
<a href="http://digg.com/submit?url=http%3A%2F%2Fcheap-tutorial.blogspot.com%2F2009%2F03%2Fhow-to-adding-digg-button.html&title=Blogspot+Tutorial%2C+Friendster+Tutorial%2C+and+Many+More">Digg IT!!!</a>
<a href="http://googleads.g.doubleclick.net/aclk?sa=l&ai=Bhx55FpasSZTtDITuvgOupdDiDvHwn4UBl7yKqAvAjbcB0IYDEAEYASCp2KQSKAQ4AFCNhpzwAWDpsuGD3A2yARtjaGVhcC10dXRvcmlhbC5ibG9nc3BvdC5jb226AQoxMjB4NjAwX2FzyAEB2gEjaHR0cDovL2NoZWFwLXR1dG9yaWFsLmJsb2dzcG90LmNvbS_gAQKoAwGwA_v_2BDIAwfoA6YD6AP4A-gDH_UDCAAABZgEAA&num=1&sig=AGiWqtxAOoqvbSAE9D4KbynBcisW6aOQqg&client=ca-pub-1518446867954941&adurl=http://keywordmax.com/tracking/log.php%3Fid%3D660304845%26url_id%3D4263382&nm=4">Download MEta tRader</a><br>
<a href="www.blogspot.com">Blogspot</a><br>
<a href="http://freewebsubmission.com/">BLog DIrectory</a><br>
</div>
The result like this.
Kampanye Damai Indonesia
Google Translate
Free Domain
Blogspot Tutorial
Digg IT!!!
Download MEta tRader
Blogspot
BLog DIrectory
If you want to set up the height and width of this widget, please change the amount of width and height. Ok, happy trying!!1 Good LucK!!!
READ MORE - Make a Scroll Widget to Blog
You only need to use this code.
<div style="overflow:auto;width:400px;height:50px;padding:10px;border:1px solid #eee">
Put what you want here!
</div>
Example:
<div style="overflow:auto;width:300px;height:50px;padding:10px;border:1px solid #eee">
<a href="http://www.kampanyedamaiindonesiapemilu2009.co.cc">Kampanye Damai Indonesia</a>
<a href="http://translate.google.com">Google Translate</a><br>
<a href="http://www.co.cc/?id=162555">Free Domain</a><br>
<a href="http://cheap-tutorial.blogspot.com/search/label/Blogspot%20Tutorial?max-results=150">Blogspot Tutorial</a><br>
<a href="http://digg.com/submit?url=http%3A%2F%2Fcheap-tutorial.blogspot.com%2F2009%2F03%2Fhow-to-adding-digg-button.html&title=Blogspot+Tutorial%2C+Friendster+Tutorial%2C+and+Many+More">Digg IT!!!</a>
<a href="http://googleads.g.doubleclick.net/aclk?sa=l&ai=Bhx55FpasSZTtDITuvgOupdDiDvHwn4UBl7yKqAvAjbcB0IYDEAEYASCp2KQSKAQ4AFCNhpzwAWDpsuGD3A2yARtjaGVhcC10dXRvcmlhbC5ibG9nc3BvdC5jb226AQoxMjB4NjAwX2FzyAEB2gEjaHR0cDovL2NoZWFwLXR1dG9yaWFsLmJsb2dzcG90LmNvbS_gAQKoAwGwA_v_2BDIAwfoA6YD6AP4A-gDH_UDCAAABZgEAA&num=1&sig=AGiWqtxAOoqvbSAE9D4KbynBcisW6aOQqg&client=ca-pub-1518446867954941&adurl=http://keywordmax.com/tracking/log.php%3Fid%3D660304845%26url_id%3D4263382&nm=4">Download MEta tRader</a><br>
<a href="www.blogspot.com">Blogspot</a><br>
<a href="http://freewebsubmission.com/">BLog DIrectory</a><br>
</div>
The result like this.
Kampanye Damai Indonesia
Google Translate
Free Domain
Blogspot Tutorial
Digg IT!!!
Download MEta tRader
Blogspot
BLog DIrectory
If you want to set up the height and width of this widget, please change the amount of width and height. Ok, happy trying!!1 Good LucK!!!
Sunday, March 1, 2009
Adding Emoticon to Shoutbox
You love to chat on Yahoo! Messenger? If you have a chat on Yahoo! Messenger, you certainly ever see the unique emoticons Yahoo. That emoticon can use at the time chatting. If we are happy, we can send messages with happy emoticons when chat to our friends.
Not only in Yahoo! Messenger, you can also install emoticons in Yahoo! Messenger on your Shoutbox. Quite easy to do, you need the address / URL of the emoticon. For example the code below is the HTML code from one of the emoticons.
<img border='0' src='http://us.i1.yimg.com/us.yimg.com/i/mesg/emoticons7/21.gif'/>
Then address / URL of the image is.
http://us.i1.yimg.com/us.yimg.com/i/mesg/emoticons7/21.gif
You have to get the URL of the emoticon. To paste this emoticon into Shoutbox, follow the steps below.
If you apply the above step, then your Shoutbox will also have the emoticons.
READ MORE - Adding Emoticon to Shoutbox
Not only in Yahoo! Messenger, you can also install emoticons in Yahoo! Messenger on your Shoutbox. Quite easy to do, you need the address / URL of the emoticon. For example the code below is the HTML code from one of the emoticons.
<img border='0' src='http://us.i1.yimg.com/us.yimg.com/i/mesg/emoticons7/21.gif'/>
Then address / URL of the image is.
http://us.i1.yimg.com/us.yimg.com/i/mesg/emoticons7/21.gif
You have to get the URL of the emoticon. To paste this emoticon into Shoutbox, follow the steps below.
- Log in to Shoutmix.
- At Display click Smiley.
- Paste the address / URL of the image that you get in the blank box that located under the Smiley Image URL.
- Click the Add button beside. You can also add the address of another picture to add more pictures.
- Click Save Settings button. Finished.
If you apply the above step, then your Shoutbox will also have the emoticons.
Thursday, February 26, 2009
Add Top Comentators Widget in Blog
There is someone who ask me via email. The contents such as this.
Dear Andre.
I want to ask you, how do I add a Top Comentators widget in the blog sidebar?
Regards.
That is the content of the email someone sent via email. Well, I will answer questions through this article, so that everyone can read it.
With the Top Comentators widget, people who visit the blog we will know who has
to comment. The widget is also good to attract readers that would also
provide commentary. Therefore, you need to install this widget in your
blog sidebar. If you do not want to install, also no problem.
Now, your blog is equipped with a Top Comentators widget.
READ MORE - Add Top Comentators Widget in Blog
Dear Andre.
I want to ask you, how do I add a Top Comentators widget in the blog sidebar?
Regards.
That is the content of the email someone sent via email. Well, I will answer questions through this article, so that everyone can read it.
With the Top Comentators widget, people who visit the blog we will know who has
to comment. The widget is also good to attract readers that would also
provide commentary. Therefore, you need to install this widget in your
blog sidebar. If you do not want to install, also no problem.
- Log in with your blogger account.
- Go to Layout.
- You will taken to Layout page, click on Add Gadget.
- Pop-up window will opened. Click at HTML/Javascript. Then copy hte code below and paste to blank box.
<script type="text/javascript">
function pipeCallback(obj) {
document.write("<ol>");
var i;
for (i = 0; i < obj.count ; i++)
{
var href = "'" + obj.value.items[i].link + "'";
var item = "<li>" + "<a href=" + href + ">" + obj.value.items[i].title + "</a> </li>";
document.write(item);
}
document.write("</ol>");
}
</script>
<script
src="http://pipes.yahoo.com/pipes/pipe.run?_render=json&_callback=pipeCallback&_id=c92ac21897d8b56e61cfa85930dd89a1&filter=nickname&url=http%3A%2F%2FBlogName.blogspot.com&num=10"
type="text/javascript"></script> - Then save. Finished
Now, your blog is equipped with a Top Comentators widget.
Wednesday, February 11, 2009
Add Google Talk Widget to Blog

You know Google Talk?? Ok, i will explain. With Google Talk, you can send instant message, make voice calls, leave voice message, etc. And now, are you know Google Talk also can installed in our blog?? Not know how to make it?? Ok, follow this steps.
1. Log in to your blogger ID.
2. After steps above, click on Layout.
3. You will directly to open Page Elements tab. Click on Add Widget.
4. Select Add Third-party functionaly or other code to your blog.
5. Copy code below and pasted into blank box that provided.
<iframe width="234" frameborder="0" src="http://talkgadget.google.com/talkgadget/client?fid=gtalk0&relay=http%3A%2F%2Fwww.google.com%2Fig%2Fifpc_relay" height="350">
</iframe><p style="margin:-8px 0"><br /><center>
<a style="text-decoration:none;font-size:70%;" href="http://blogging-trick.blogspot.com/2008/01/add-google-talk-to-blog.html">Add to your blog</a></center></p>
6. Then save.
Now, you will see Google Talk Widget in your blog. Have fun with this widget!!!
See you next time at my new post guys!!!
Sunday, February 8, 2009
Tracking Blog Statistic with Google Analyticts
If you have blog, of course you want to tracking your blog statistic. And me is one from more blogger that want to know their blog statistic. Examples are tracking Hit Counter, Site Meter Track, and other. Hmm, if you included in the above, you can using service from Google Analyticts. Google Analiticts have several advantages compared to other trackers.
Google tracking points below:
1. Number of visitor every day.
2. Duration of their in our blog.
3. Browser that using for open your blog.
4. Where do they come (example: from other blog that have your link, or from search engine, etc).
5. Of states where they came.
6. Of town where tehy came.
7. Number of visitor age and other.
If you interest with Google Analiticts, you can sign up here. After sign up, Google will gave you a script that must be pasted in your blog. Remember, tracker data from Google updated every day, so, this service different with other tracker service that can change every second .
.
READ MORE - Tracking Blog Statistic with Google Analyticts
Google tracking points below:
1. Number of visitor every day.
2. Duration of their in our blog.
3. Browser that using for open your blog.
4. Where do they come (example: from other blog that have your link, or from search engine, etc).
5. Of states where they came.
6. Of town where tehy came.
7. Number of visitor age and other.
If you interest with Google Analiticts, you can sign up here. After sign up, Google will gave you a script that must be pasted in your blog. Remember, tracker data from Google updated every day, so, this service different with other tracker service that can change every second
.
Subscribe to:
Posts (Atom)

